Well it took me four months, but I finally finished my kitchen. Even though as the title of my post suggests, I didn't do a complete transformation, it was still a lot of work! I've been putting off re-doing this kitchen for years because I was dreading how much work it would be, but I finally plunged ahead and did it and I couldn't be happier with the results. I just took it super slow, so that it didn't seem overwhelming. I had the goal of completing only one wall or a half a wall a week depending on its size. It was inconvenient to take it so slow as one needs to use a kitchen everyday, so you can imagine how chaotic it was making meals: "Now where is the silverware?" was a common question asked all four months 😆. But taking it slow was a great idea for both my stress levels, and my aging old body.
Ok, on to the tour! First of all, as always and keeping true to my "I'm the worst blogger in there world" self-award, I don't have a lot of "before" or "during" photos. But honestly, this post is already so photo heavy, if I would have put all the "before" pictures in this post, it would be too long. So, if you want to see "Before" photos, you will have to go to this post
HERE, otherwise, you will only see two "Before" photos on this post.
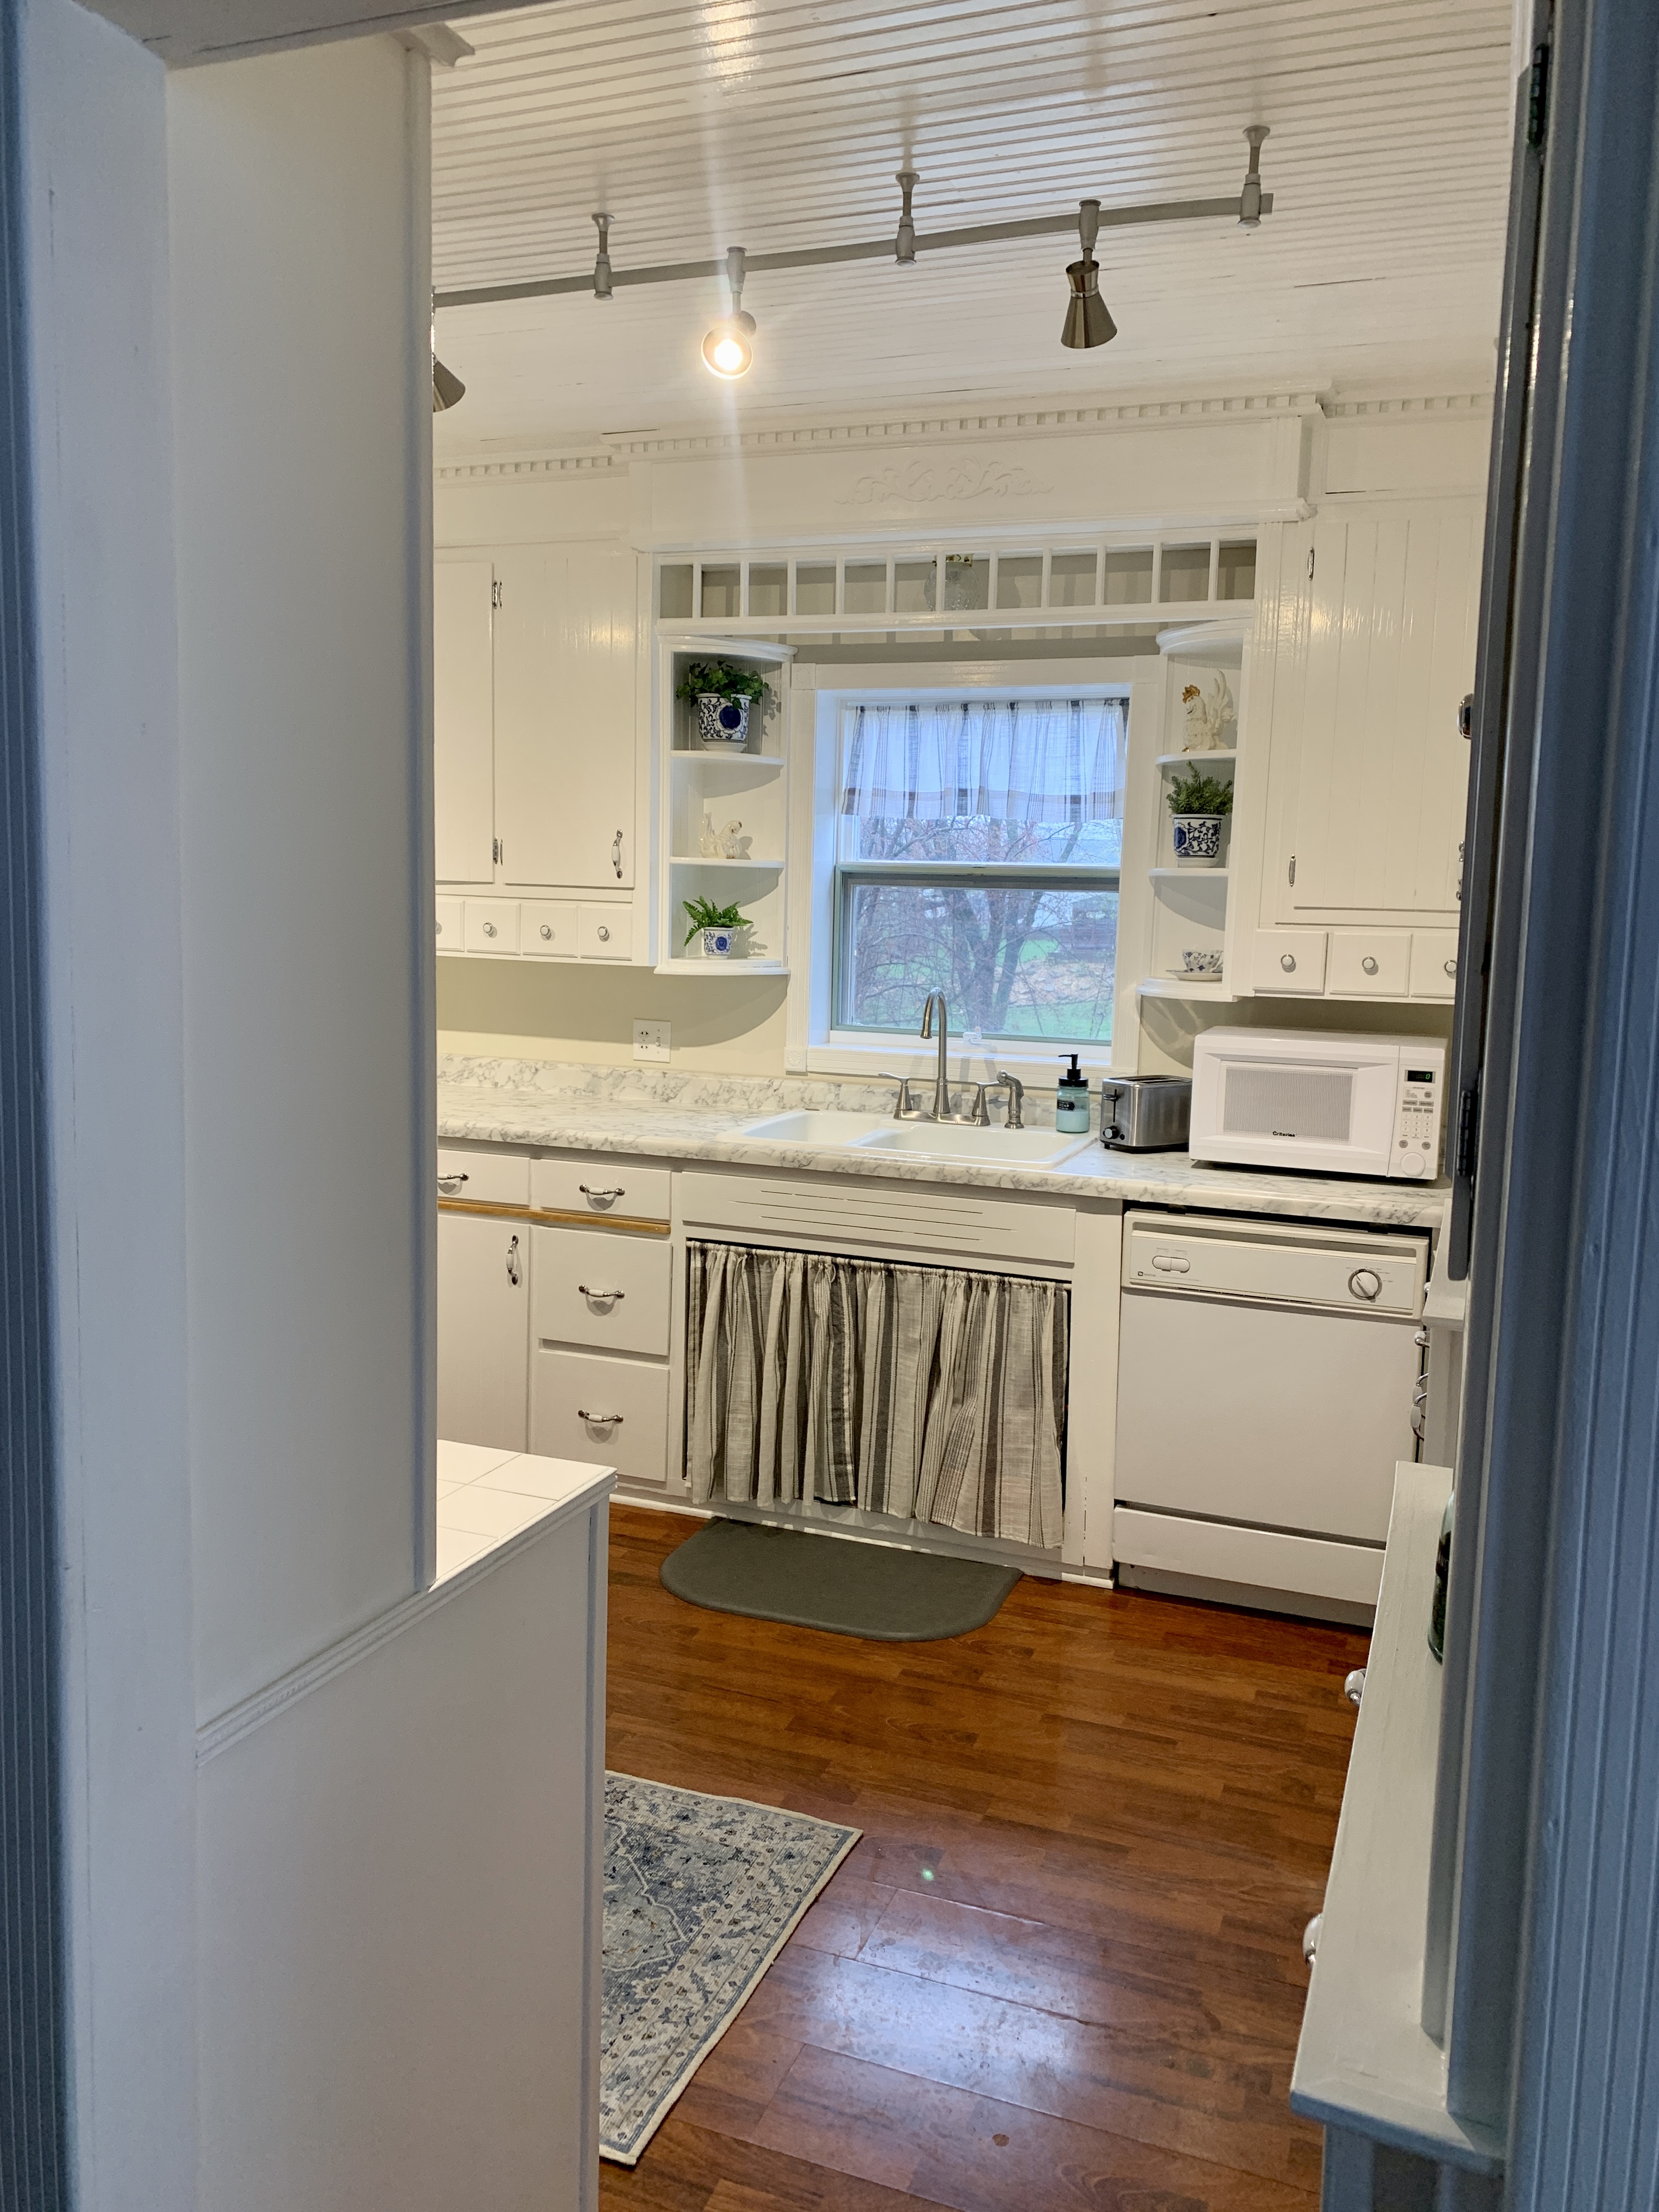
I'm going to the tour the kitchen from right to left making a complete circle from the entry point to the kitchen. The photo below is how the kitchen looks as you just walk into the room. Behind me would be the dining room, so it's not a far walk at all to the eating area. It's a small kitchen: wider than a galley kitchen but not wide enough to eat in or have an island.
Now, it may look like the kitchen has all its original woodwork, but I assure you everything but the cabinet doors is new and made to look old. A previous homeowner gutted this kitchen in the 70s and removed any of its late 1800s history. My husband and I wanted to restore the kitchen to its old-world charm while keeping modern day necessities. All of these restorations were completed twenty-five years ago.
Now let's talk about "How I Remodeled My Kitchen By Making Just a Few Changes".
1) Declutter
The first thing I did was declutter. I donated everything I didn't use or didn't love. The top photo (sorry for the bad quality but it's a very old photo) shows what the china cabinets looked "Before" and the bottom photo shows them "After". I couldn't believe what a difference decluttering alone made in the room.
2) Remove any Dated Decor
The second small change I made was to eliminate any dated decor; such as the stenciled border above the wainscoting.
3) Clean
4) Give the Room a Fresh Coat of Pain
The china cabinets were all custom made by my husband 25 years ago, but the entire room was in dire need of a fresh coat of paint. The 25 year old white paint was really starting to show its age with yellowing, stains, and chips. So every single cabinet door had to come off and be sanded, primed, and re-painted. Oh, and I forgot, first I had to clean 25 years of grease! Yikes! That took a week to do alone.
I had so much junk on and in these china cabinets that I never used anymore...so out they went. I couldn't believe how much nicer everything looked once all the "junk" was gone.
Here is how I keep some of my spices from my garden that I use everyday: large vintage blue canning jars with handmade chalkboard labels.
5) Bring in Fresh New Decor
After sending boxes and boxes of "stuff" off to the thrift store, I didn't want to run to the store and buy all new things, but I did buy a few new things to keep up with the current trends. I removed the old plates off the wall and added these modern floral prints from Hobby Lobby. They have an unfinished wooden frame which matches the other natural wood finished in the room.
I should also mention that the wall color is not what it actually looks like in real life. For some reason they turn out a taupe color in the photos, but the walls are painted "Colonial White", a soft, off-white with yellow undertones. The cabinets are painted "Ultra-White" in a high gloss.
6). Color Coordinate the Room
This is cabinet number 2. I got rid of anything "Yellow" that was in the original kitchen, and stuck with only blue, white, silver, crystal, and natural wood. When you have open cabinetry like this, the way to avoid the cluttered, messy look is to keep the colors unified.
On this shelf I put plates and bowls that we use the most (once again only in shades of blue and white), and Jackson's pet food.
The large center wall features the sink, dishwasher, and microwave.
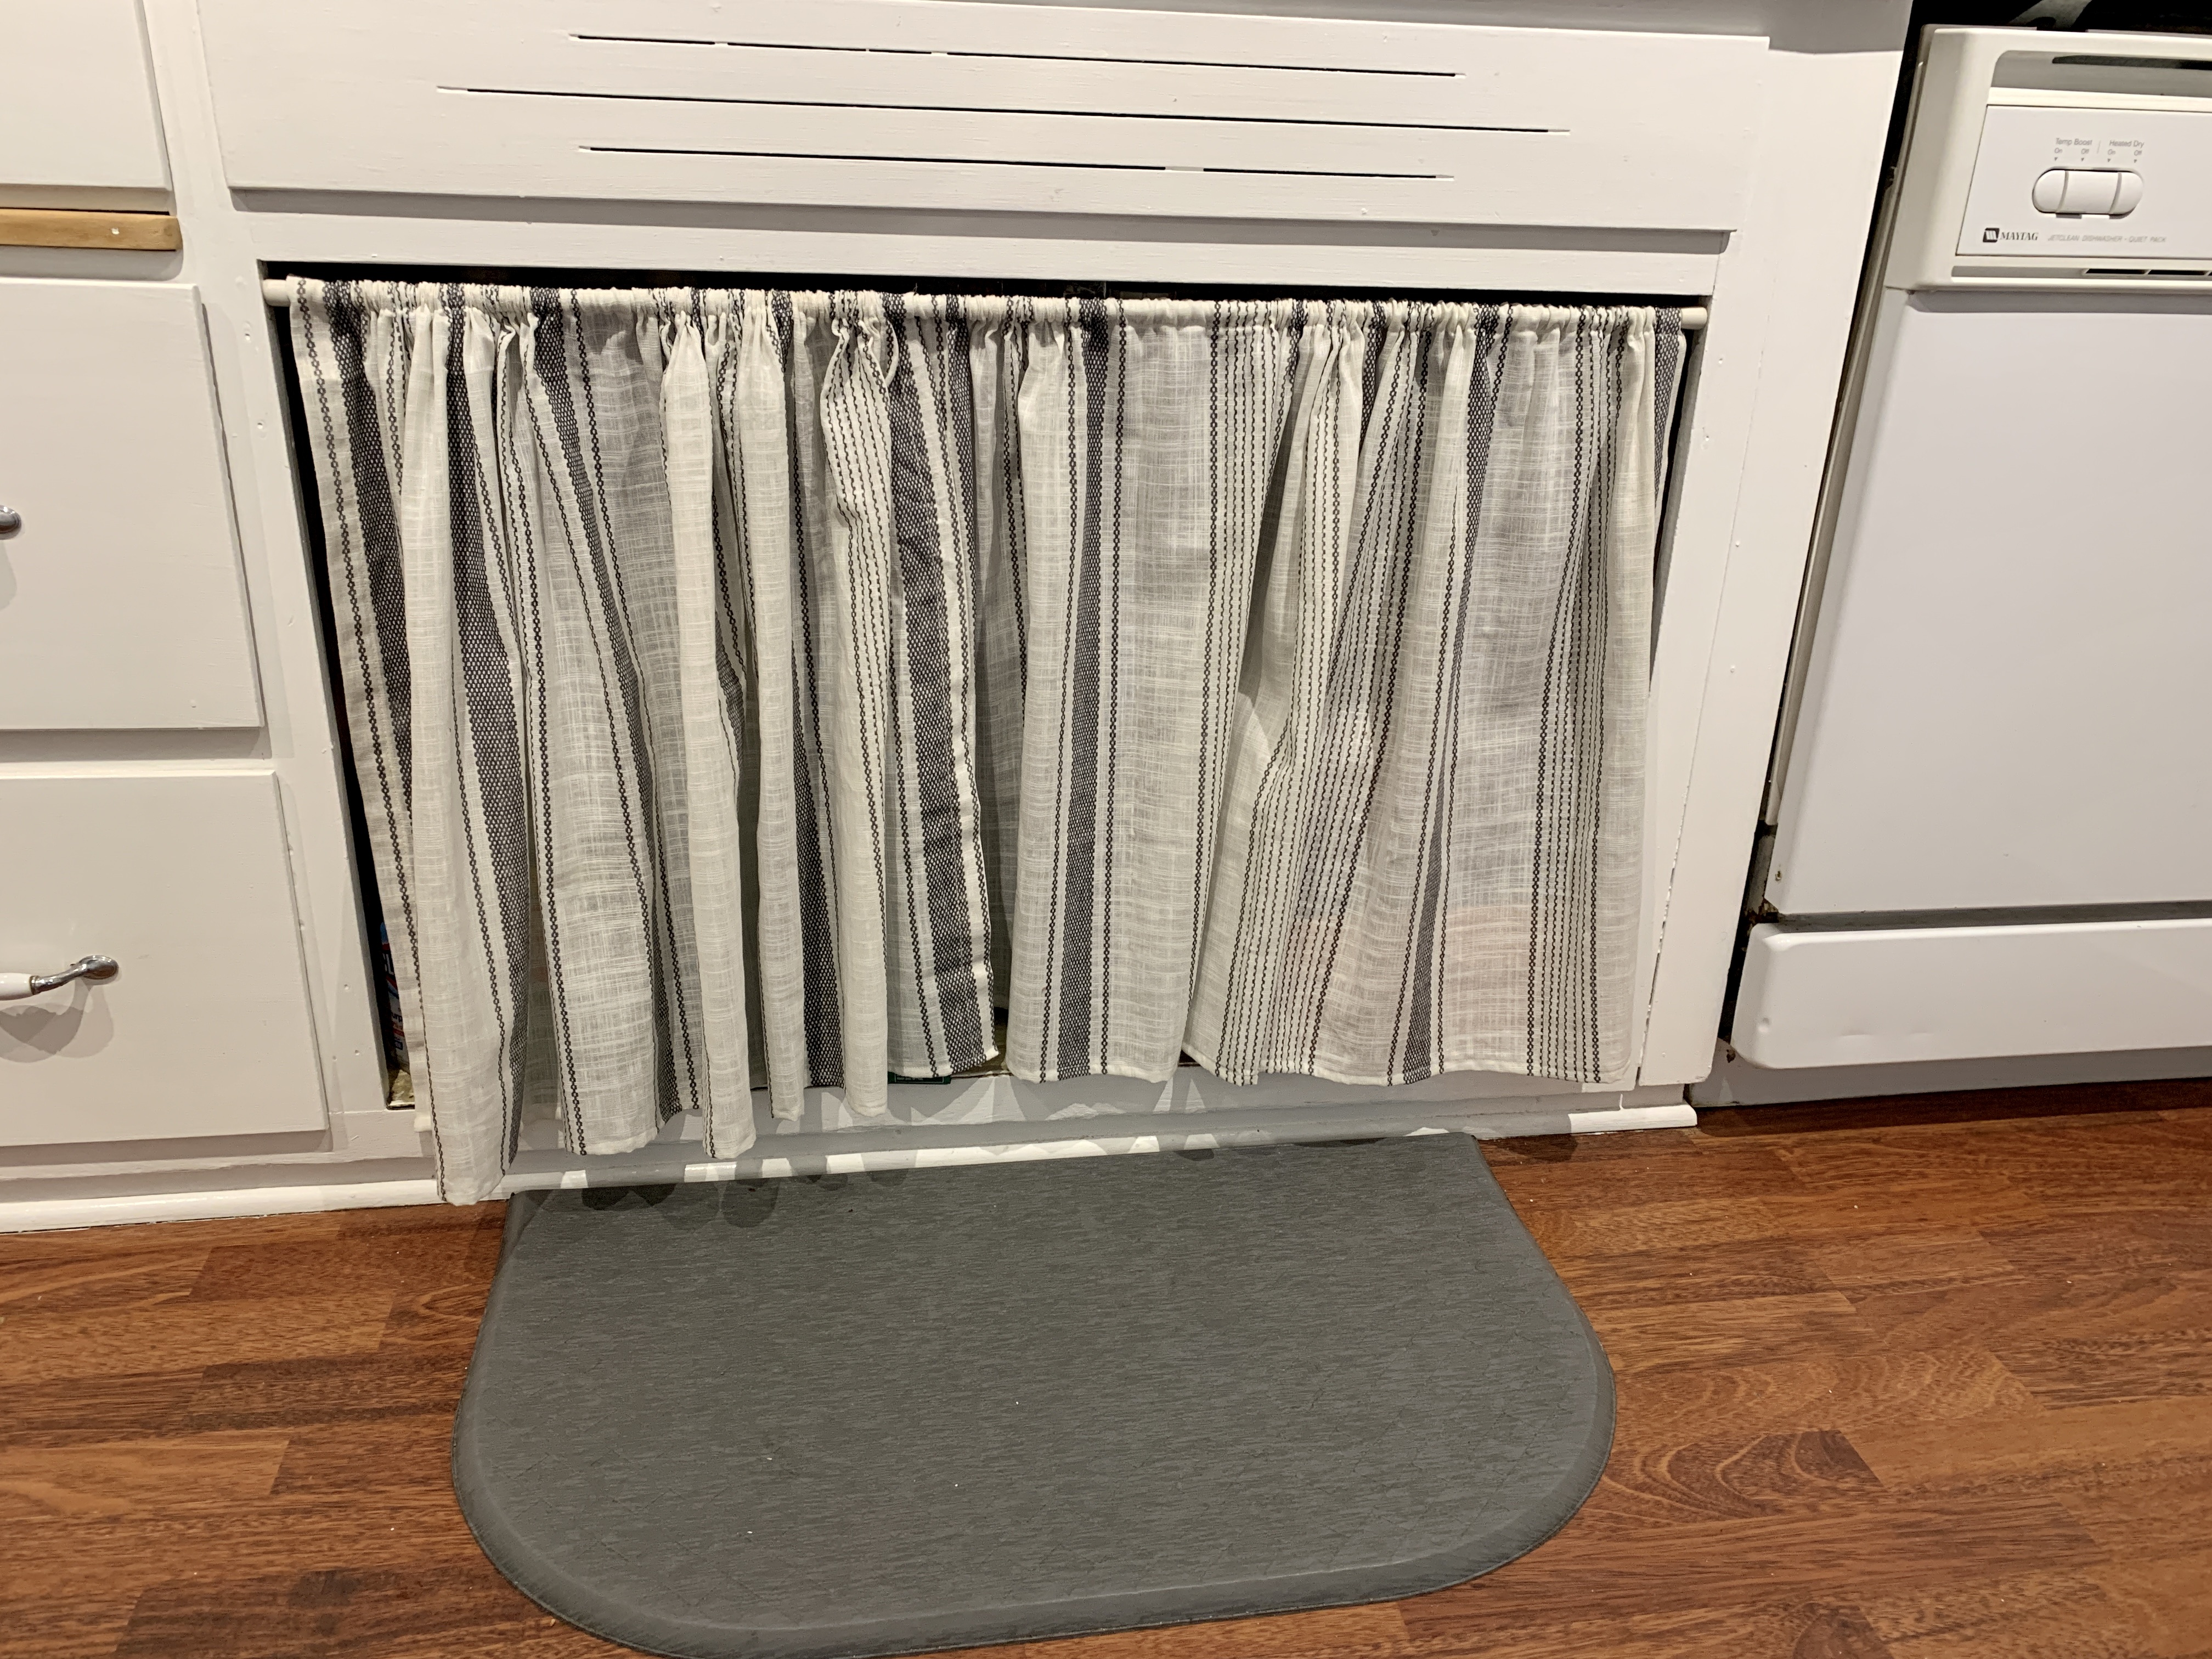
7) Add New Curtains
I used to have a striped blue and yellow curtain and I replaced them with this vintage black and white stripe. I had the hardest time finding just the right material to make my new curtains, and I had to make them because I wanted the window curtain and sink curtain to match. I ultimately found a curtain panel at Walmart that was exactly what I was looking for, so I cut it up and made both curtains out of one panel for $8.00.
8) Add New Space Rugs
On each side of the sink is an area to display decorative items (if you wish, they could also be used for practical items). In the photos below you can see what a difference decluttering makes. The left is the "Before" photo and the right is the "After Photo".
I kept only one item on each shelf and I removed the color yellow from the room.
9) Add a New Countertop
I know, I know, adding a new counter top is not a small change, but it does make a big impact in the room if you're not going to change much else. In my situation, I had to have a new counter top because the previous one was damaged, otherwise, I would have kept my old counter top. I looked into painting a counter top and/or using one of those epoxy finishes, but in the end, it cost the same amount of money to just buy a new laminate counter top and it was probably half the amount of work. If I would have painted the counter top, it would have taken three days. By ordering a counter top cut-to-size, and paying extra to have the sink portion pre-cut, it took my husband and I less than 4 hours to put in.
The long band of unfinished wood you see in the photo is a cutting board that can be pulled out when needed.
I chose a laminate faux-marble counter top for several reasons. 1) Marble is on trend 2) I wanted white countertops, but an all white counter top would not provide enough contrast to the cupboards, whereas the black veining gives just the right amount of contrast 3) My old countertops were blue, and over time the blue finish wore off in spots. I didn't want that to happen again, so I wanted to avoid a dark color where wear and tear would show. If this counter top starts to wear off in spots, it will not be as noticeable. And 4) We went with a laminate instead of real marble because we wanted to do the work ourselves.
On top of my new counter top I added this
round wooden serving tray to keep my
water pitcher and hold other items like fruit. This has worked out really nice for it keeps the counter clean because everything goes on the tray and not the counter. Items don't get spread out all over the counter making a cluttered mess; they stay neatly on the tray.
10) Spray Paint Items to Give Them a New Look
On the far end of the kitchen is a plate rail (hand made by my hubby 25 years ago), and a rolling kitchen cart and stepping stool.
My old kitchen had an open yellow and white metal rolling cart and the stepping stool was also yellow and white. I have to have a stepping stool in this kitchen to reach items in my upper cabinets. I thought of buying a new one, but my old one has much history with my family. The grandkids love sitting on this stool when they come over and would have been heartbroken if I would have gotten rid of it. So, using black and silver spray paint, I repainted it. It wasn't easy, I had to wrap one section while I sprayed the other to keep the two colors separate, but I did it.
The cart, I was happy to get rid of. I ordered this
new wooden one from Amazon and I couldn't be more pleased with it. I'm using it now as a coffee bar, but it will come in handy during canning season when I need more counter space. I will simply roll it over to the stove area and extend the leaves.
11) Buy New Appliances
The only new appliance I purchased was a coffee maker. My old one leaked plus was starting to look kinda nasty, wrecking the look of my "New Kitchen". I chose this one by
Hamilton Beach because I only drink one cup of coffee a day, but I still want to have a carafe option for when I have company. I absolutely LOVE this coffee maker! You can use any size mug or travel mug, you just adjust the heights of the "cups" (the round items underneath my mug).
12) Buy New Dinnerware
I did buy new dinner plates because I actually needed more. We were always running out of plates, especially when the grandkids came over. This set is from
Target
On top of the plate rail, I added a wooden sign I already owned, and a new silver rustic container from Hobby Lobby filled with greenery.
And now for the last wall of the kitchen. On this wall is the refrigerator and stove. My husband built the entire wooden structure surrounding the stove 25 years ago. The tile is nice to have next to a stove because I can set hot things on it straight from the stove top or oven without worrying about damaging the counter top.
This was another area where I did some major decluttering. I had so much "stuff" cluttering the top and cubbies before. Everything went "bye-bye" except for what I really loved and/or used.
The first thing I did was take just about everything off the top of the cupboard leaving only a few decorative pieces. Oh, what a relief that was! Everything up here always got coated with a nasty dust/grease and it was so time-consuming to clean. By keeping only a minimum number of objects on the top shelf, it will make cleaning a lot easier.
13) Buy New Usable Kitchen Items
If you couldn't tell by now, I love, love, love all the natural wooden decor that's trending right now. But, staying true to my "Don't keep it if you can't use it", I didn't want to buy anything new that I didn't use. Well, I do use cutting boards, so I bought two in different sizes from TJMaxx. They not only look lovely as a decoration, but I use them as well.
The cookie jar is actually an oversized
Ball canning jar from Menards. It makes the perfect cookie jar because I cannot only see all my pretty homemade cookies, but it is air tight as well.
I had so many blue and white items that were gifts from my family and friends that I didn't want to part with. The blue and white planter was from my daughter years ago. I simply put a real plant inside to add some color.
14) Use Coordinating Decorative Containers
When I decluttered this area, I removed most of the decor-only items and kept only decorative containers to hold items I use almost everyday like flour, sugar, tea, etc. I keep garlic cloves in the blue and white ceramic container.
Before my kitchen remodel I had a huge problem storing all my spices. I have a huge collection of spices and I had them scattered all over the kitchen in various spots. Cooking was always a challenge because I was constantly searching for the right spice, and I often ended up buying duplicate spices because I couldn't find them. I decided I had to figure out how to attractively and practically store my spices and this is what I came up with:
On either side of the stove is a
bamboo spice rack with all my spices in alphabetical order. Cooking is a breeze now because all the spices are so handy and so easy to find!
I purchased both the
spice racks and
spice jars from Amazon. They come with two different sets of labels, white and black, and also blank labels if you have a spice that wasn't included in their labels.
Underneath the stove area is my second new rug which I mentioned earlier. This one is a machine-washable rug from Tumble. I know so many people are probably thinking "You put that beautiful rug underneath your stove?" Yes, because I needed a rug here to cover up both an unused vent and a flaw in the flooring. I also think it adds a lot of aesthetic to the room. The rug 'warms' up all the hard surfaces of the room. I chose a blue and white Persian theme because the colors match the colors in the room and the company recommended a Persian rug in a Modern Farmhouse kitchen.
I did drop a couple of things on my rug, and I just spot treated it immediately so it didn't stain. I also have washed it once, and I couldn't believe how easy it was. The rug came out of the washer as perfect as the day I received it.
15) Add New Lighting
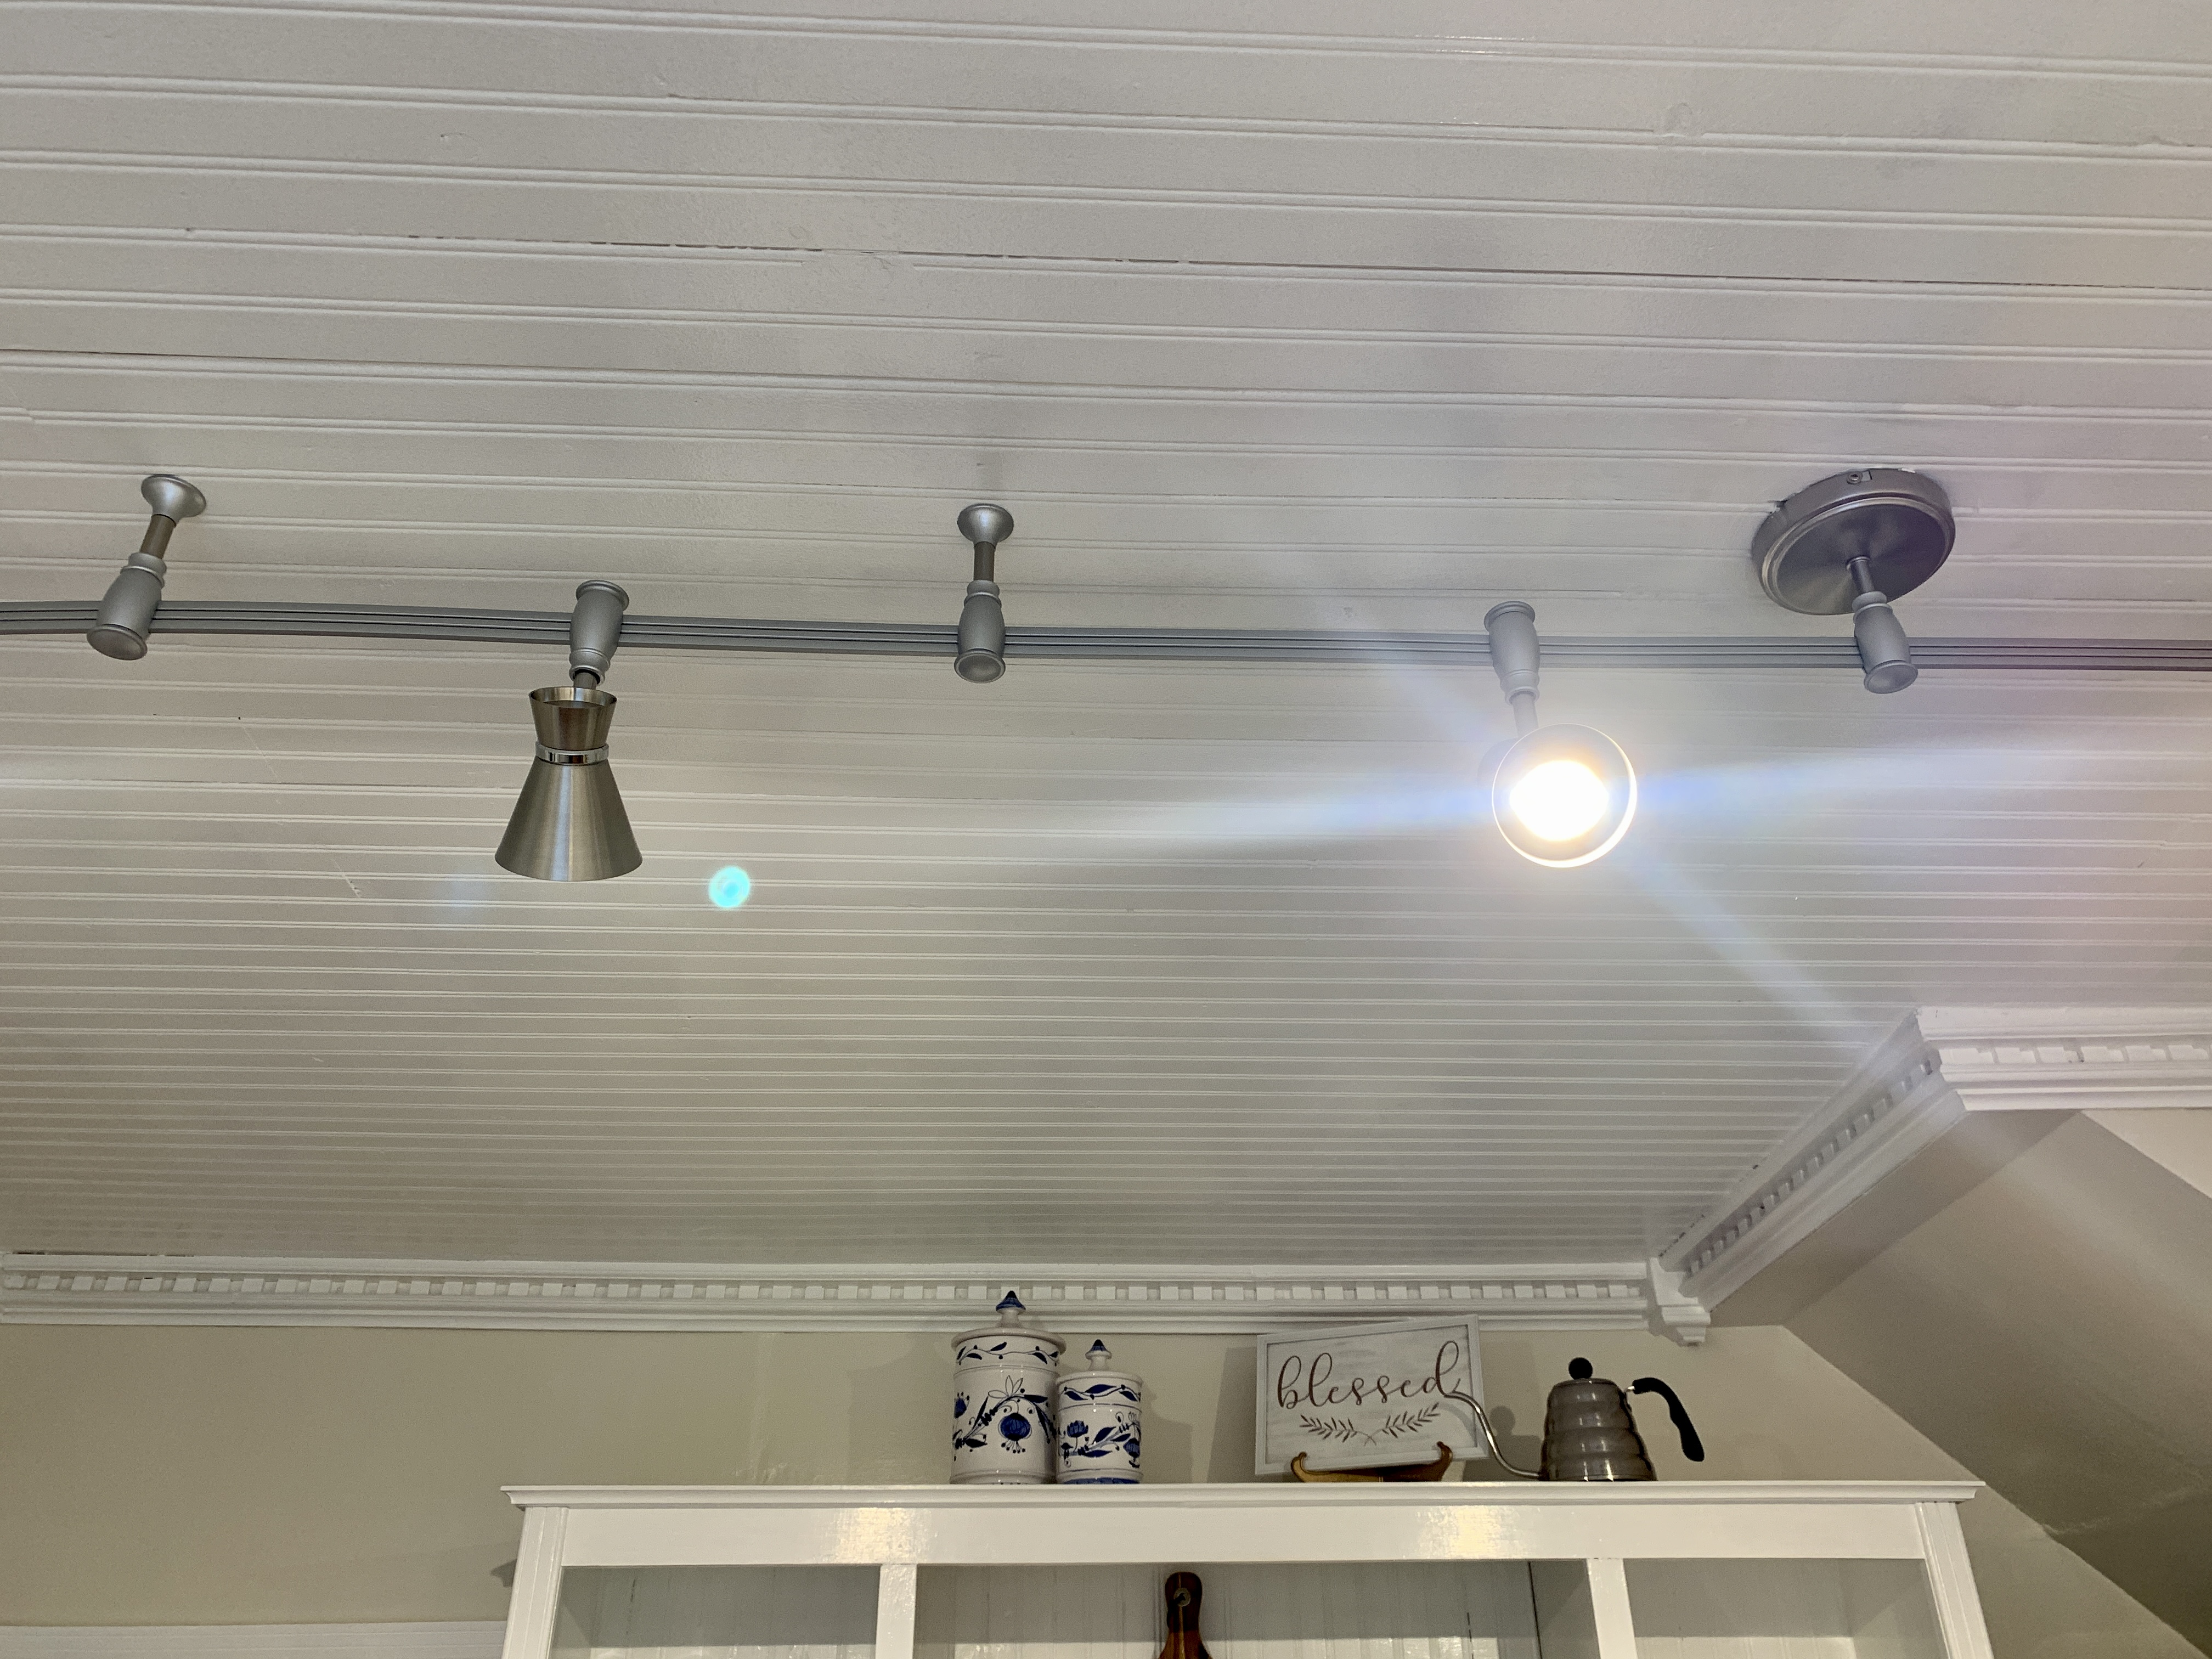
And finally, my 15th and last recommended change to make when remodeling a kitchen is to add new lighting. I can't begin to tell you how I agonized over this. I always want to stay true to the character of the house when I remodel, but this room with the old lighting fixture was so dark I couldn't see! I needed to fix the lighting issues so I not only could see what I was doing in this room, but also, just to turn this small, dark space into a lighter, brighter space. I looked at so many different lighting options, but ultimately decided track lighting was the way to go. I could aim the individual spot lights where all the dark areas of the kitchen were. I can't tell you how bright this room is now. It was actually hard for our eyes to adjust to the brightness of this room because we were so use to the darkness.
So, I didn't knock down any walls, tear out any cabinets, or buy new large appliances, but I managed to make big changes to my kitchen by making just a few small changes and a lot of hard work. Here is a summary of my costs:
--Paint
- one gallon of primer
- one gallon of wall paint
- two gallons of cabinet paint
$135.00
--New Decor
- wall hangings
- spice rack
- greenery
- wooden serving tray and cutting boards
- dinnerware
- curtains
- rugs
- cookie jar and water pitcher
- tins
- rolling cart
$700.00
--New Small Appliances
--
New Lighting $160.00
--New Countertop
- High Resolution Laminate Countertop $300.00
Grand Total: $1370.00
Wow! I can't believe it cost over $1000 to remodel my kitchen especially since we did all the work ourselves and I didn't change much. I can't even begin to imagine what this would have cost if I hired someone. But I am very pleased with the results and I don't think I will ever remodel my kitchen again, as I will probably be dead or in a retirement home when the next 25 years is up! 😆
Have A Great Day! Amy
Linking Up with these Fabulous Blogs
HERE!


You did a great job! it looks lovely, clean and fresh. Enjoy it!
ReplyDeleteThanks Julie! I'm enjoying it very much so far. It's made preparing meals so much easier with the few changes I made.
DeleteIt turned out beautifully and love the blue and white! Great choice on the countertop too and loving the wooden accents you added.
ReplyDeleteI have begun my own kitchen remodel and like you have decided to go slow or it would be too overwhelming so I am working in sections. Finally found new hinges (it wasn't easy as we have really old cabinets and there was only one style that worked.) I'm still only in the sanding process so it will definitely take some time to complete but I am really looking forward to it.
Thank you. The blue and white theme was there before, I just simplified it. It's so classic, it just fits an old fashioned kitchen. Oh, I'm so excited you're remodeling your kitchen too. Yes, take it slow, then it's not so overwhelming. I hope you share photos when you're done.
DeleteOh very good makeover thanks for share with us
ReplyDeleteAll these tips
Thank you, and you're welcome.
DeleteThe remodel looks nice, curtains too. Thanks so much for linking up at #IMadeItMondayLinkParty 10. Shared.
ReplyDeleteThanks Dee!
DeleteWhat an awesome job you have done with the remodeling of your kitchen. I love those old vintage spice jars you have.
ReplyDeleteI visited you via Tuesdays with a Twist #523!
If you are not already part of SSPS, this is a personal invite to hop over and come and share your posts with us at Senior Salon Pit Stop, every Monday to Saturday.
See my entries: 16+17 and then navigate to the bottom of my page for the Senior Salon Pit Stop linkup, we hope to meet you there virtually.
Thank you! Yes, I started linking up with SSPS. I'll be over to visit you soon.
DeleteThat turned out great! Your kitchen looks so lovely.
ReplyDeleteThanks Joanne.
DeleteI truly enjoyed this tour of your fresh, updated kitchen. I like the lightness of the color palette and the uncluttered shelves and counter tops. I have too many small appliances out on my counters but we use the blender almost everyday and the coffee maker and the can opener. That leaves the air fryer and the toaster over that I could put up until I use them. Maybe I will do that. It would definitely open things up.
ReplyDeleteGreat job on the curtains. And I love the rug from Tumble. In Panama, I lived in a pre-WWII apartment in the Canal Zone and had super tall cabinets with glass doors. Made dotted Swiss curtains for them in blue and white. Always looked so clean.
I have a spice drawer but really like your spice racks. Wish all of my bottles were uniform sizes. Might have to consider splurging and getting some like yours.
Thanks Leslie. Yes, I put the majority of my appliances in the pantry unless I use them everyday. I don't have much counter space in my kitchen, so I had to do that or there'd be no room to prepare food. Your Swiss dots curtains sound adorable. Yes, the spice jars were a splurge, but so worth it!
DeleteYou have such a beautiful kitchen. I love all of your simple ideas to make things look fresh and new. I also love the white and blue color scheme. I would love to put in new countertops in my kitchen.
ReplyDeleteThanks so much. Oh, I know the pain of wanting a new countertop. I wish they weren't so difficult and pricey to install. I had to really twist my hubby's arm for this one, but in the end, he agreed it made a huge difference.
DeleteWell done restoring the kitchen back to its old self. Love all the changes you made and the little details are just perfect. Your kitchen looks beautiful. Enjoy!
ReplyDelete-Soma
Thanks so much!
DeleteAmy, CONGRATS! Your post is FEATURED at #IMadeItMondayLinkParty 11.
ReplyDeleteThanks so much! That's awesome news!
DeleteGreat job on this makeover!! The "after" pictures are so clean and fresh and pretty (but your kitchen looked very nice in the "before" pictures, too). Your attention to detail and elegant little touches really paid off. Thank you for sharing this post in the Talent-Sharing Tuesdays Link-Up 63.
ReplyDeleteCarol
www.scribblingboomer.com
Thank you! Oh, yes, I always loved my kitchen "before" too that's why I didn't change much. It just needed a fresh coat of paint, some decluttering, and a few changes to make cooking easier for me as my age (like better lighting, spice jars all in one place, etc.)
DeleteI am not sure what it looked like before but your kitchen is adorable now. I absolutely do love the updated look very much. The white cabinetry gives it a fresh and bright look. I love that you decluttered and choose a color scheme that didn't overwhelm. The china cabinets look fantastic. I also love the spices and all the little decorating touches such as the wooden water tray, the big plate you displayed, and your mason jars. Well done!!!
ReplyDeletebosbodaciousblog.blogspot.ca
Did you see the "Before" link to a separate post in the second paragraph? I didn't change much, I basically just gave everything a fresh coat of paint, and decluttered. I had a "Blue, white and yellow" theme before with a tea pot theme. I got rid of the yellow and removed the tea pot stencil off the wall and lots of other things that I mentioned in the post, and I added all the natural wood elements. Thanks so much!
DeleteVisiting again to say thanks so much for linking up at the #UnlimitedLinkParty 111. Shared.
ReplyDeleteThanks Dee!
DeleteWow, Amy. I've enjoyed reading about every step you've taken in designing your new kitchen! We're in the home stretch of ours being done so I'm appreciating all the work you've put into yours. And yes, the simplifying of all the stuff we accumulated along the way ... I think that's a huge key in celebrating our refreshed spaces. Thanks for sharing your journey!
ReplyDeleteThanks so much Linda. Yes, decluttering does a lot!
DeleteLooks so very cool. A great job was done.
ReplyDeleteThanks so much!
DeleteSuch a great refresh, Amy... and I love all the tips! I'm delighted to be featuring your post at Tuesday Turn About this week! Pinned!
ReplyDeleteThank you! Oh, that's awesome news! Thanks so much.
DeleteBeautiful kitchen! I love it :)
ReplyDeleteThank you!
DeleteHello!
ReplyDeleteA very inspiring post! Your kitchen looks beautiful! I'm planning to renovate mine myself, first of all I have to paint it :)
Greetings from Poland!
Thanks so much! Good luck on your renovation!
DeleteWhat a classic and clean look.
ReplyDeleteThank you for sharing your links with us at SSPS. Please check back on Monday to see if your content has been featured.
Thank you! I will!
DeleteBeautiful.. you did a wonderful job Amy.
ReplyDeleteThanks so much!
DeleteAmy, CONGRATS! Your post is FEATURED at the #UnlimitedLinkParty 112!
ReplyDeleteThanks so much Dee! That's great news! I so appreciate it!
DeleteYou have a beautiful kitchen, Amy! And I appreciate your step-by-step remodel tips. Alphabetizing spices is a game changer, isn't it?
ReplyDeleteThank you! Yes it is!
DeleteAmy your kitchen looks gorgeous! You have so much space. I live in an apartment and the kitchen is really small. I don't have any counter space, I usually have to mix and prep on my table. I've got to say that I love the shelves by your window. I've always wanted shelves like that. Your husband does great wood work. I was waiting to see your after pics.
ReplyDeleteThanks bunches for sharing this with Sweet Tea & Friends this month sweet friend.
Aww, thanks so much Paula. Yes, not having any counter space can be so frustrating. I know when the grand kids and I make cookies we usually have to use the table too.
Delete