Wednesday, November 30, 2022

Snapshots of Our Last Day of Vacation in Silver Bay, Minnesota

This is the final post of a travel series to Wisconsin and Minnesota's North Shore.  To start at the beginning, go HERE.   The rest of the posts in consecutive order are HERE HEREHEREHERE, and HERE!

Silver Bay Marina

On our last day of vacation, after we finished hiking in Tettegouche State Park,  we headed out to explore Silver Bay, Minnesota.  Our first stop was the Silver Bay Marina. 


This is a beautiful little marina with a public beach and boat launch.  Boats up to 100' can be accommodated in one of 110 spacious slips.  

There are views of the taconite plant in the distance.


There's also a short hike to an island that you can take from the marina.  It sounds interesting, but scary.  I wish I would have known about it while I was there.  You can see the hike out to the island in the photo below, and read more about the hike in this post HERE.


Grand Superior Lodge

While we were in Silver Bay we stayed at the AmericInn, but we noticed another nice place in town that was located right on the shores of Lake Superior so we decided to check it out.  It seemed pretty popular.


We did peek inside and saw a lovely lobby with a fireplace, plus a restaurant with a view of the lake.

We walked around the grounds for a bit, and we were awestruck with the serene, natural beauty.


There were wildflowers everywhere!  They looked so stunning with the blue background of Lake Superior.


Northwoods Family Grille

By now, it was supper time and we were quite hungry so we decided to check out the #1 restaurant in the town of Silver Bay:  Northwoods Family Grille.  There are not a lot of restaurants in town.  Most places were closed because it was the end of the tourist season.  We only found one other place to eat while we were there, and that was "Tracks and Racks", which is more bar than restaurant.  The food was good, but boy was it expensive!  Our meal was over $50 for a burger, a wrap, onion rings, and two drinks.  So we were quite happy to find the Northwoods Family Grille where the prices were much lower, and they had more of a family atmosphere.


Being on Lake Superior fish is the primary item on most of the restaurants menus, so that is what we ordered.  This was the second time on our vacation we ordered fish, and this fish was the best we had so far.  It tasted so fresh!


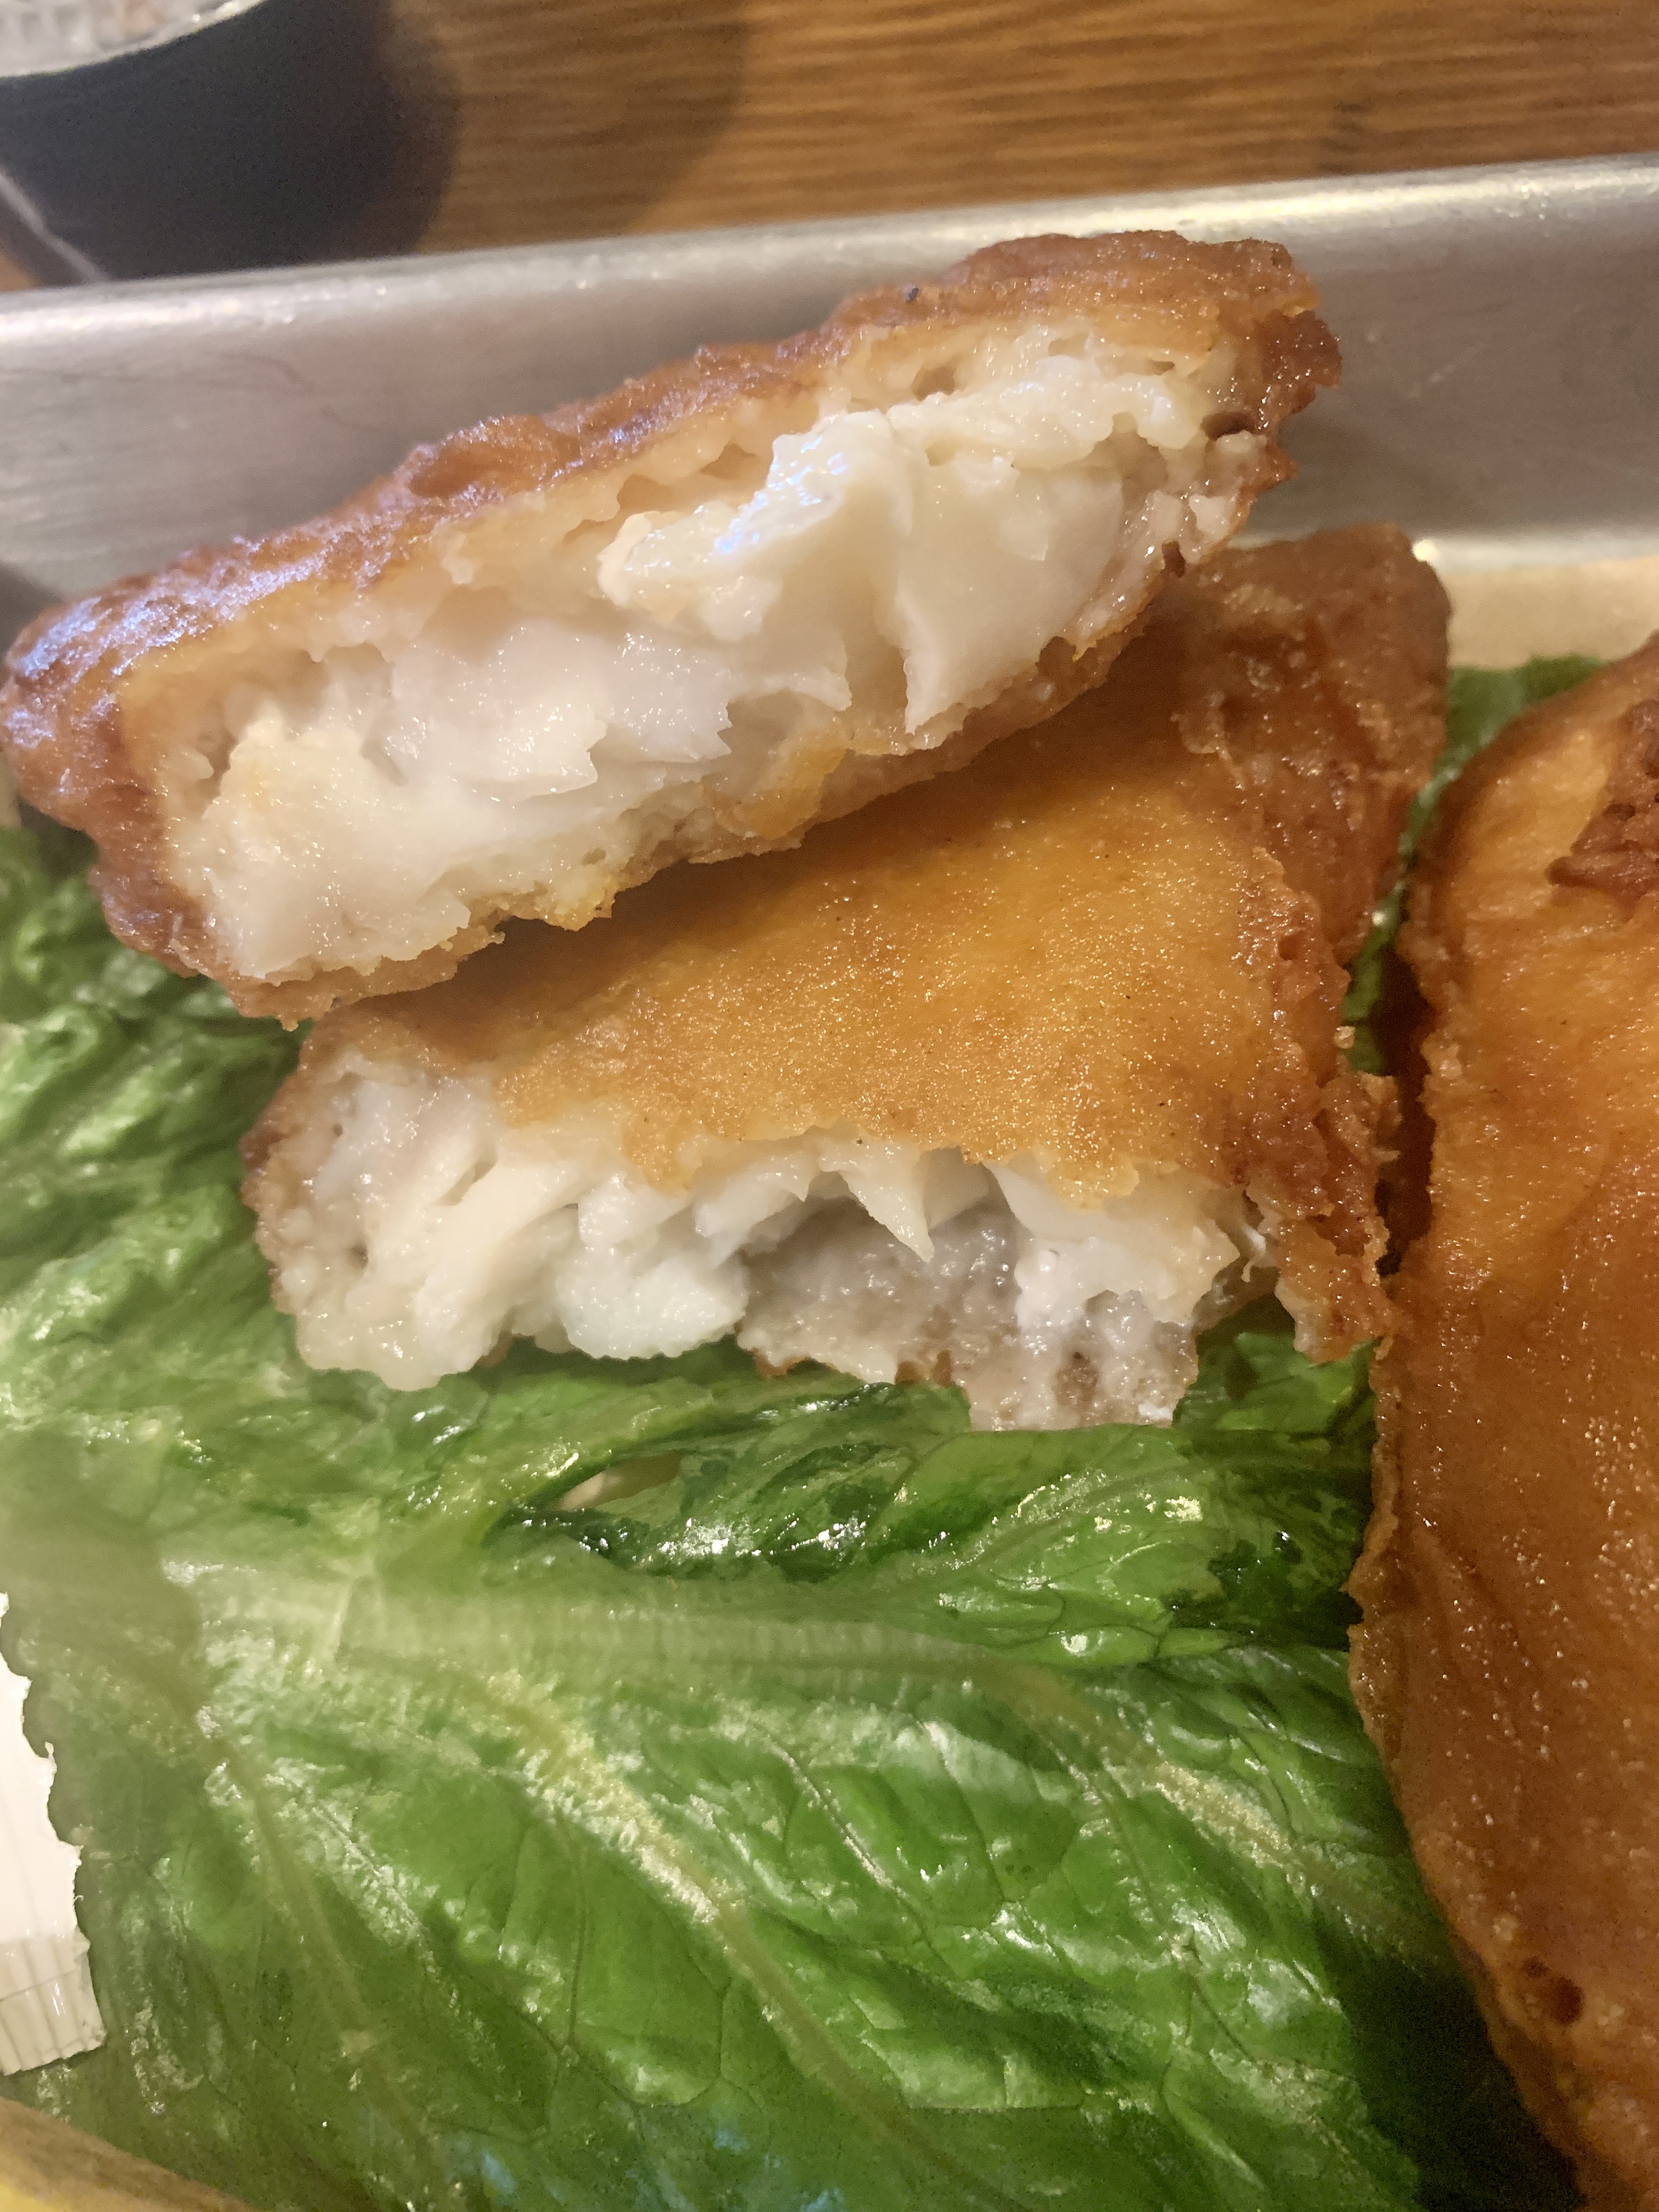
The meal was very reasonably priced and came with a nice salad, dinner roll, and baked potato.  If you're ever in Silver Bay, I highly recommend this restaurant.  Just be sure to get there early, as they close early.  You will have more of "Linner" than a "Dinner".


Silver Bay Scenic Overlook

Silver Bay Industry Overlook

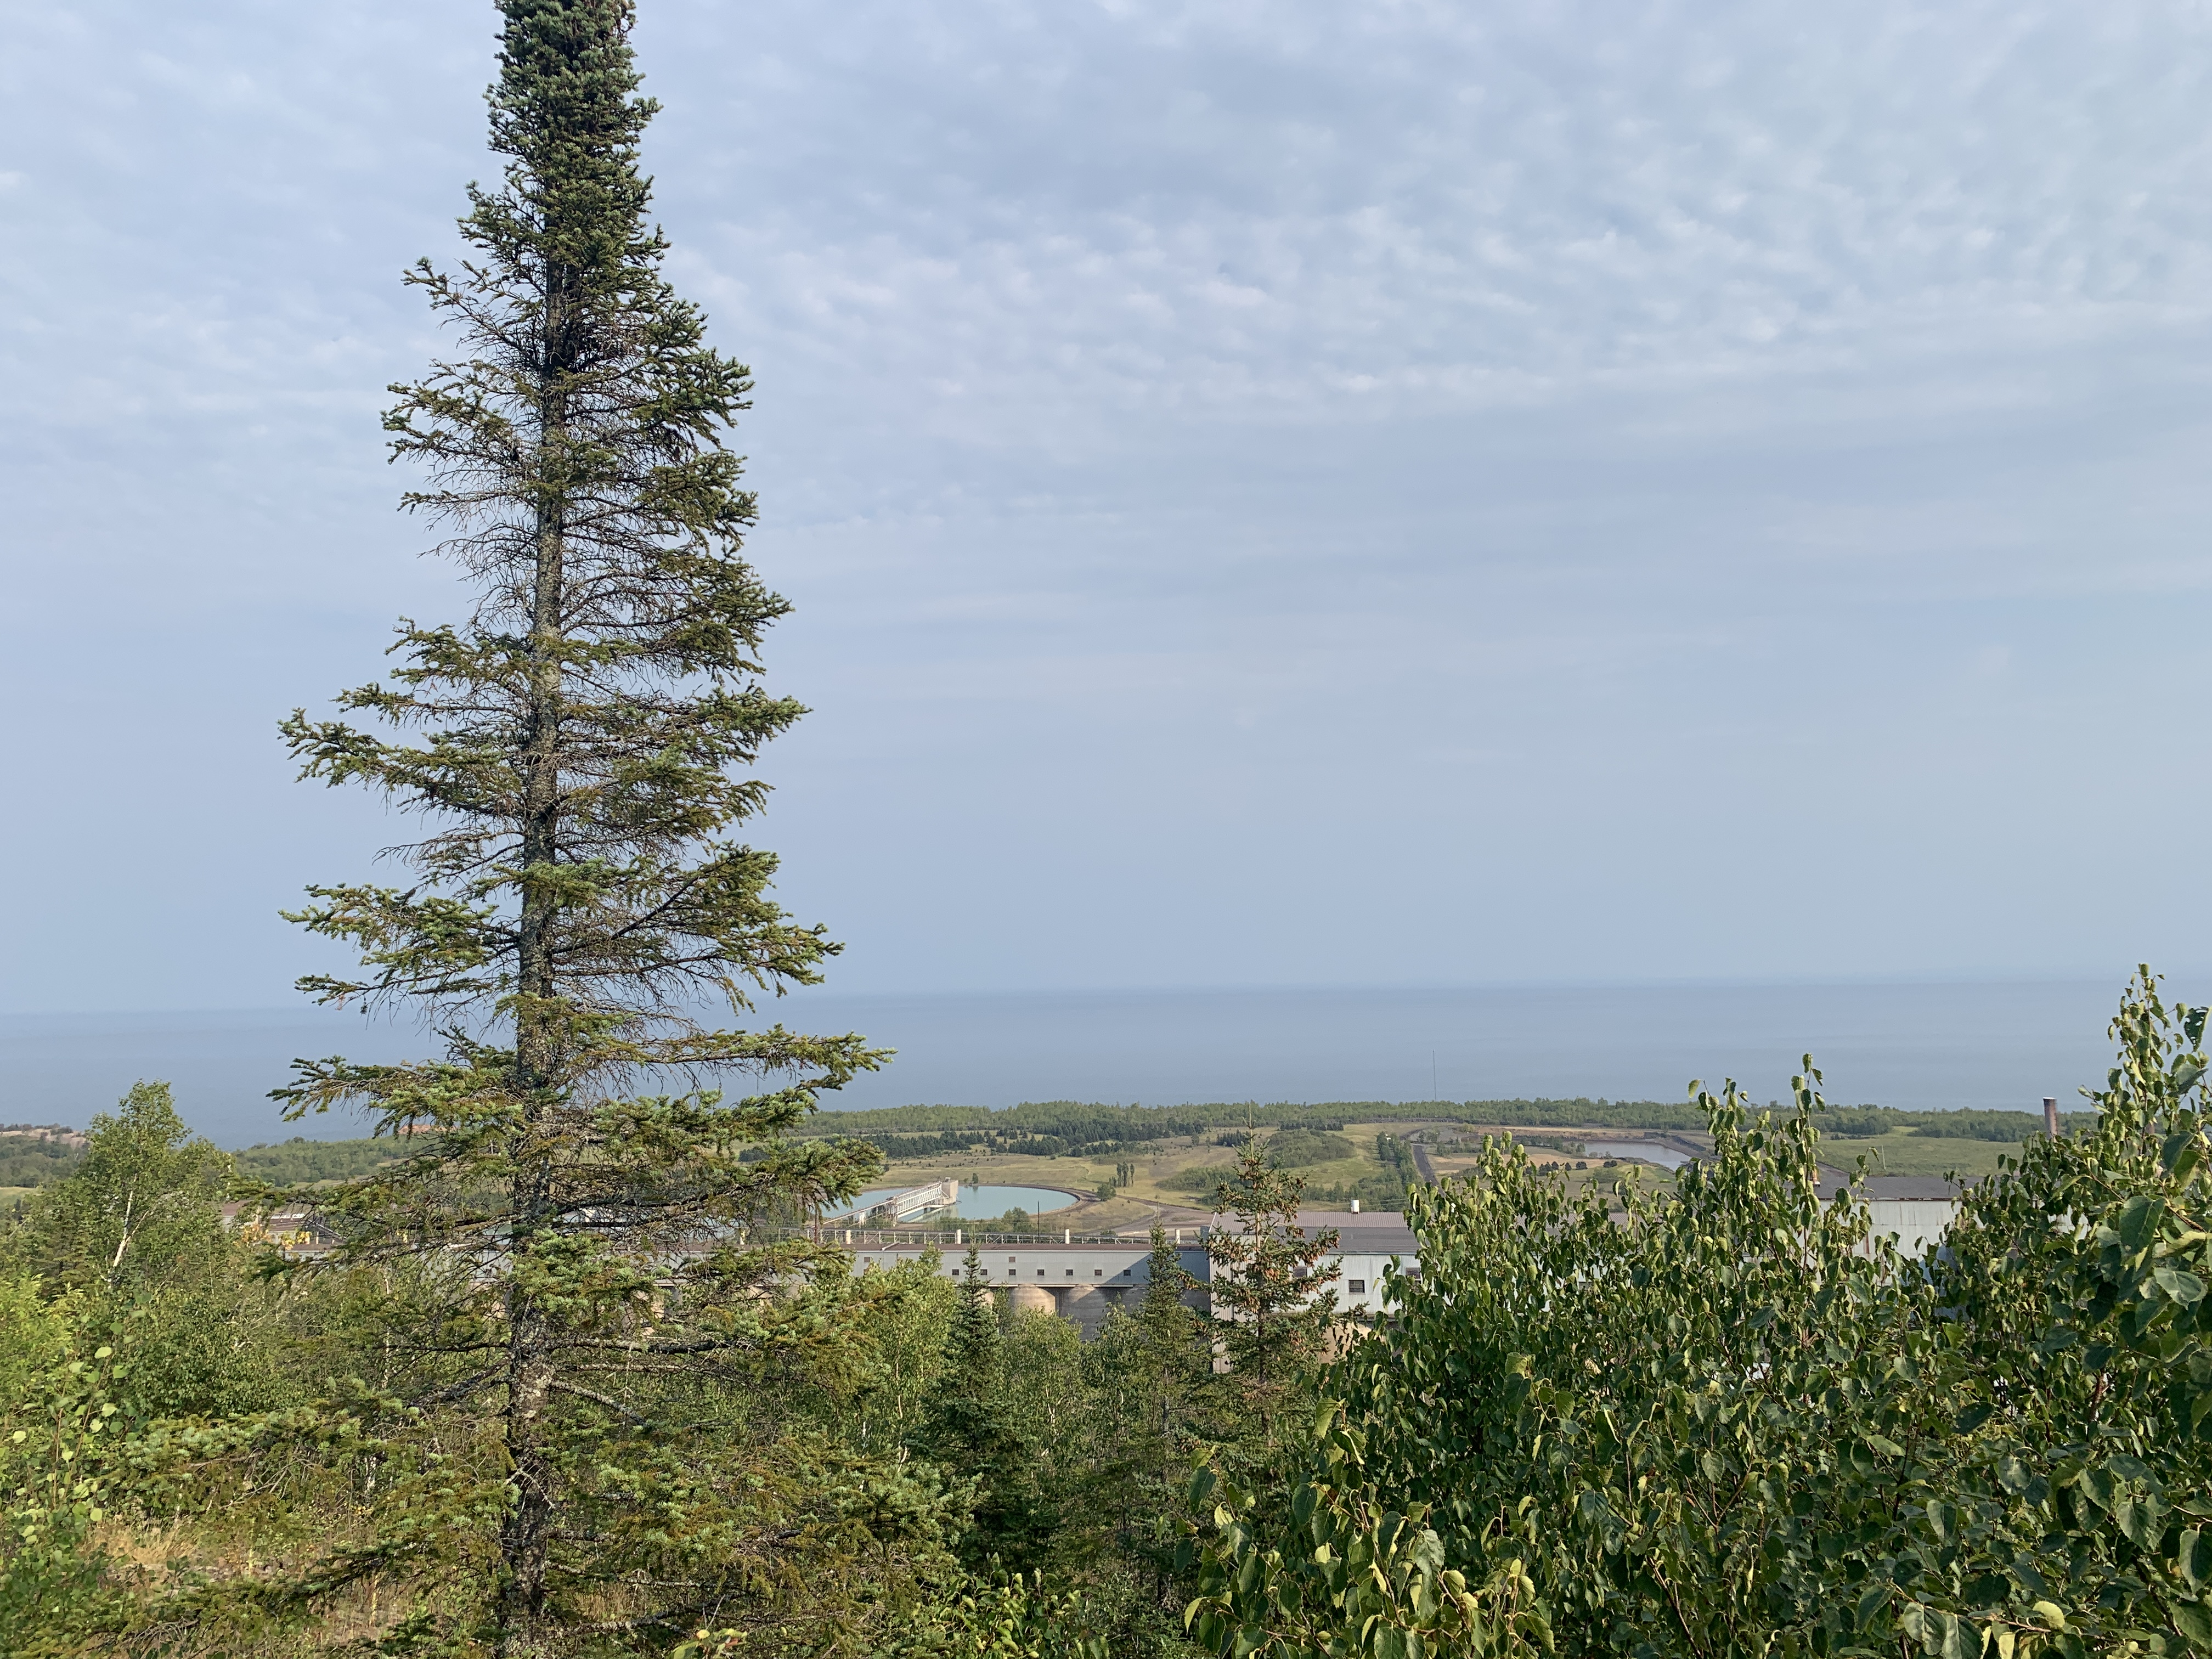
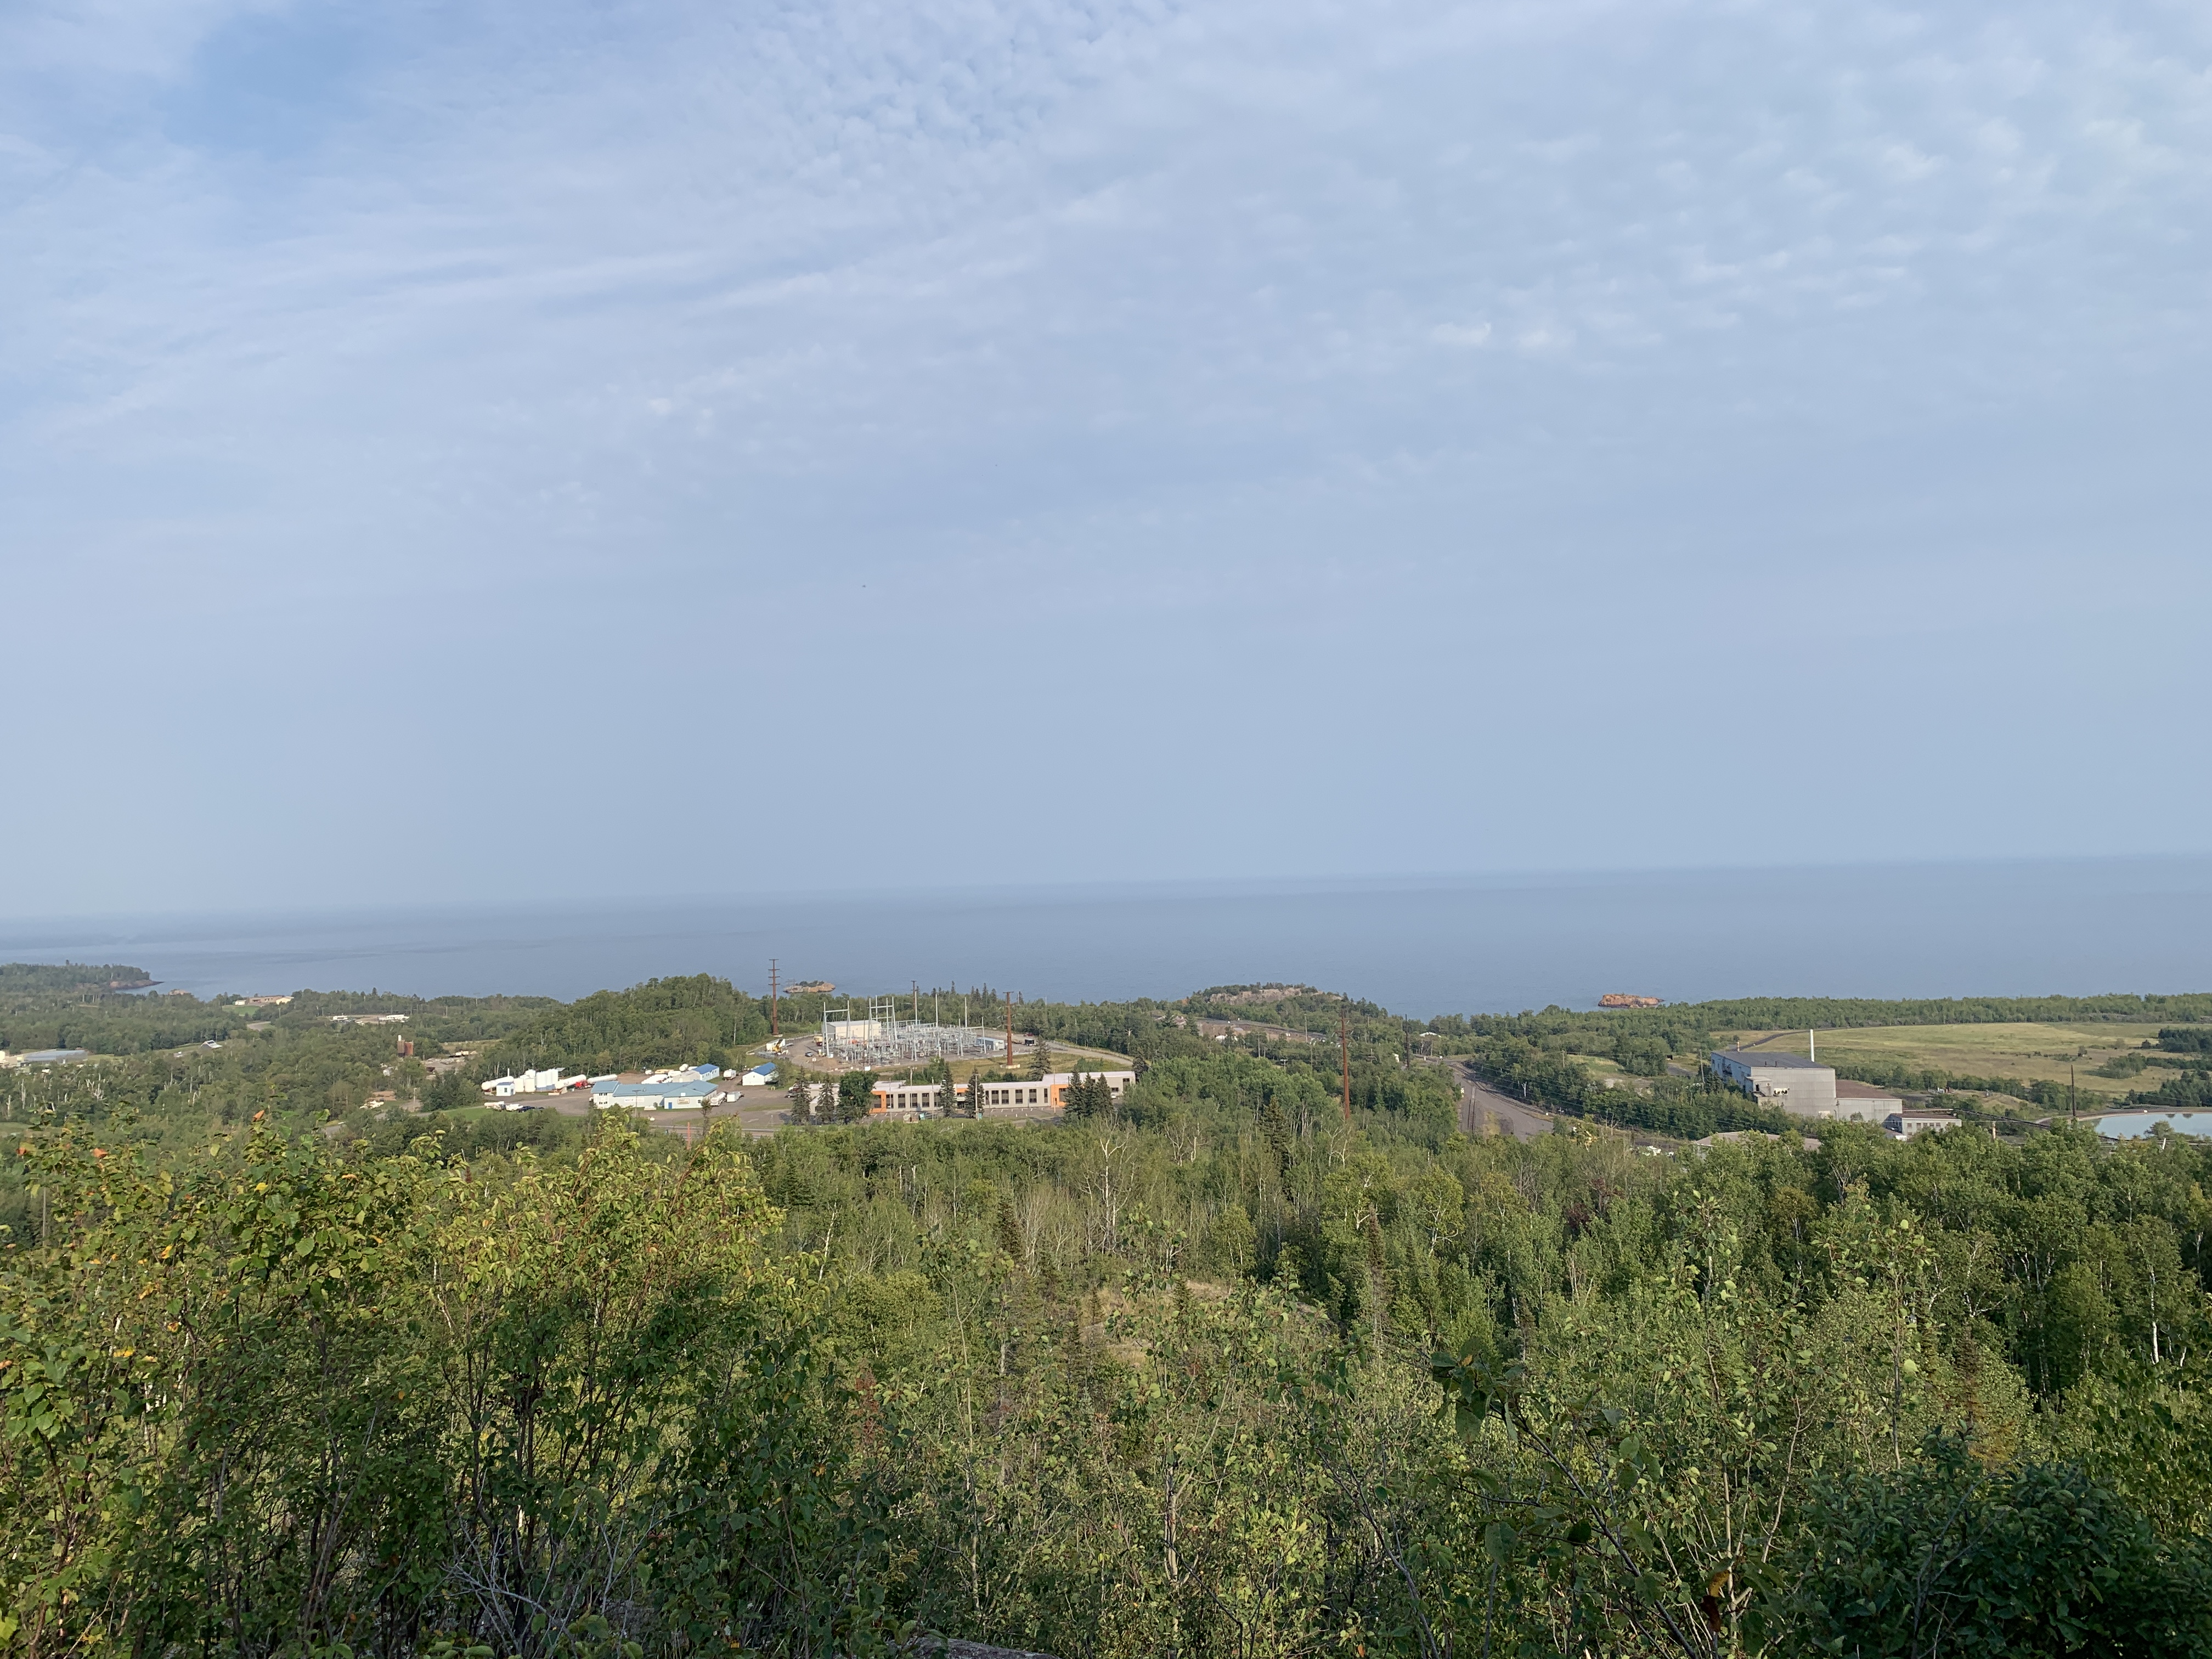
Our final stop of the day was a short hike to the Silver Bay Scenic Overlook.  This is such a nice spot in Silver Bay where you can not only see amazing views but, you learn so much about the history, past and present, of the town.  You drive to the top of the overlook, and then hike to three separate overlooks.  Each overlook has interpretive signage identifying the sights.


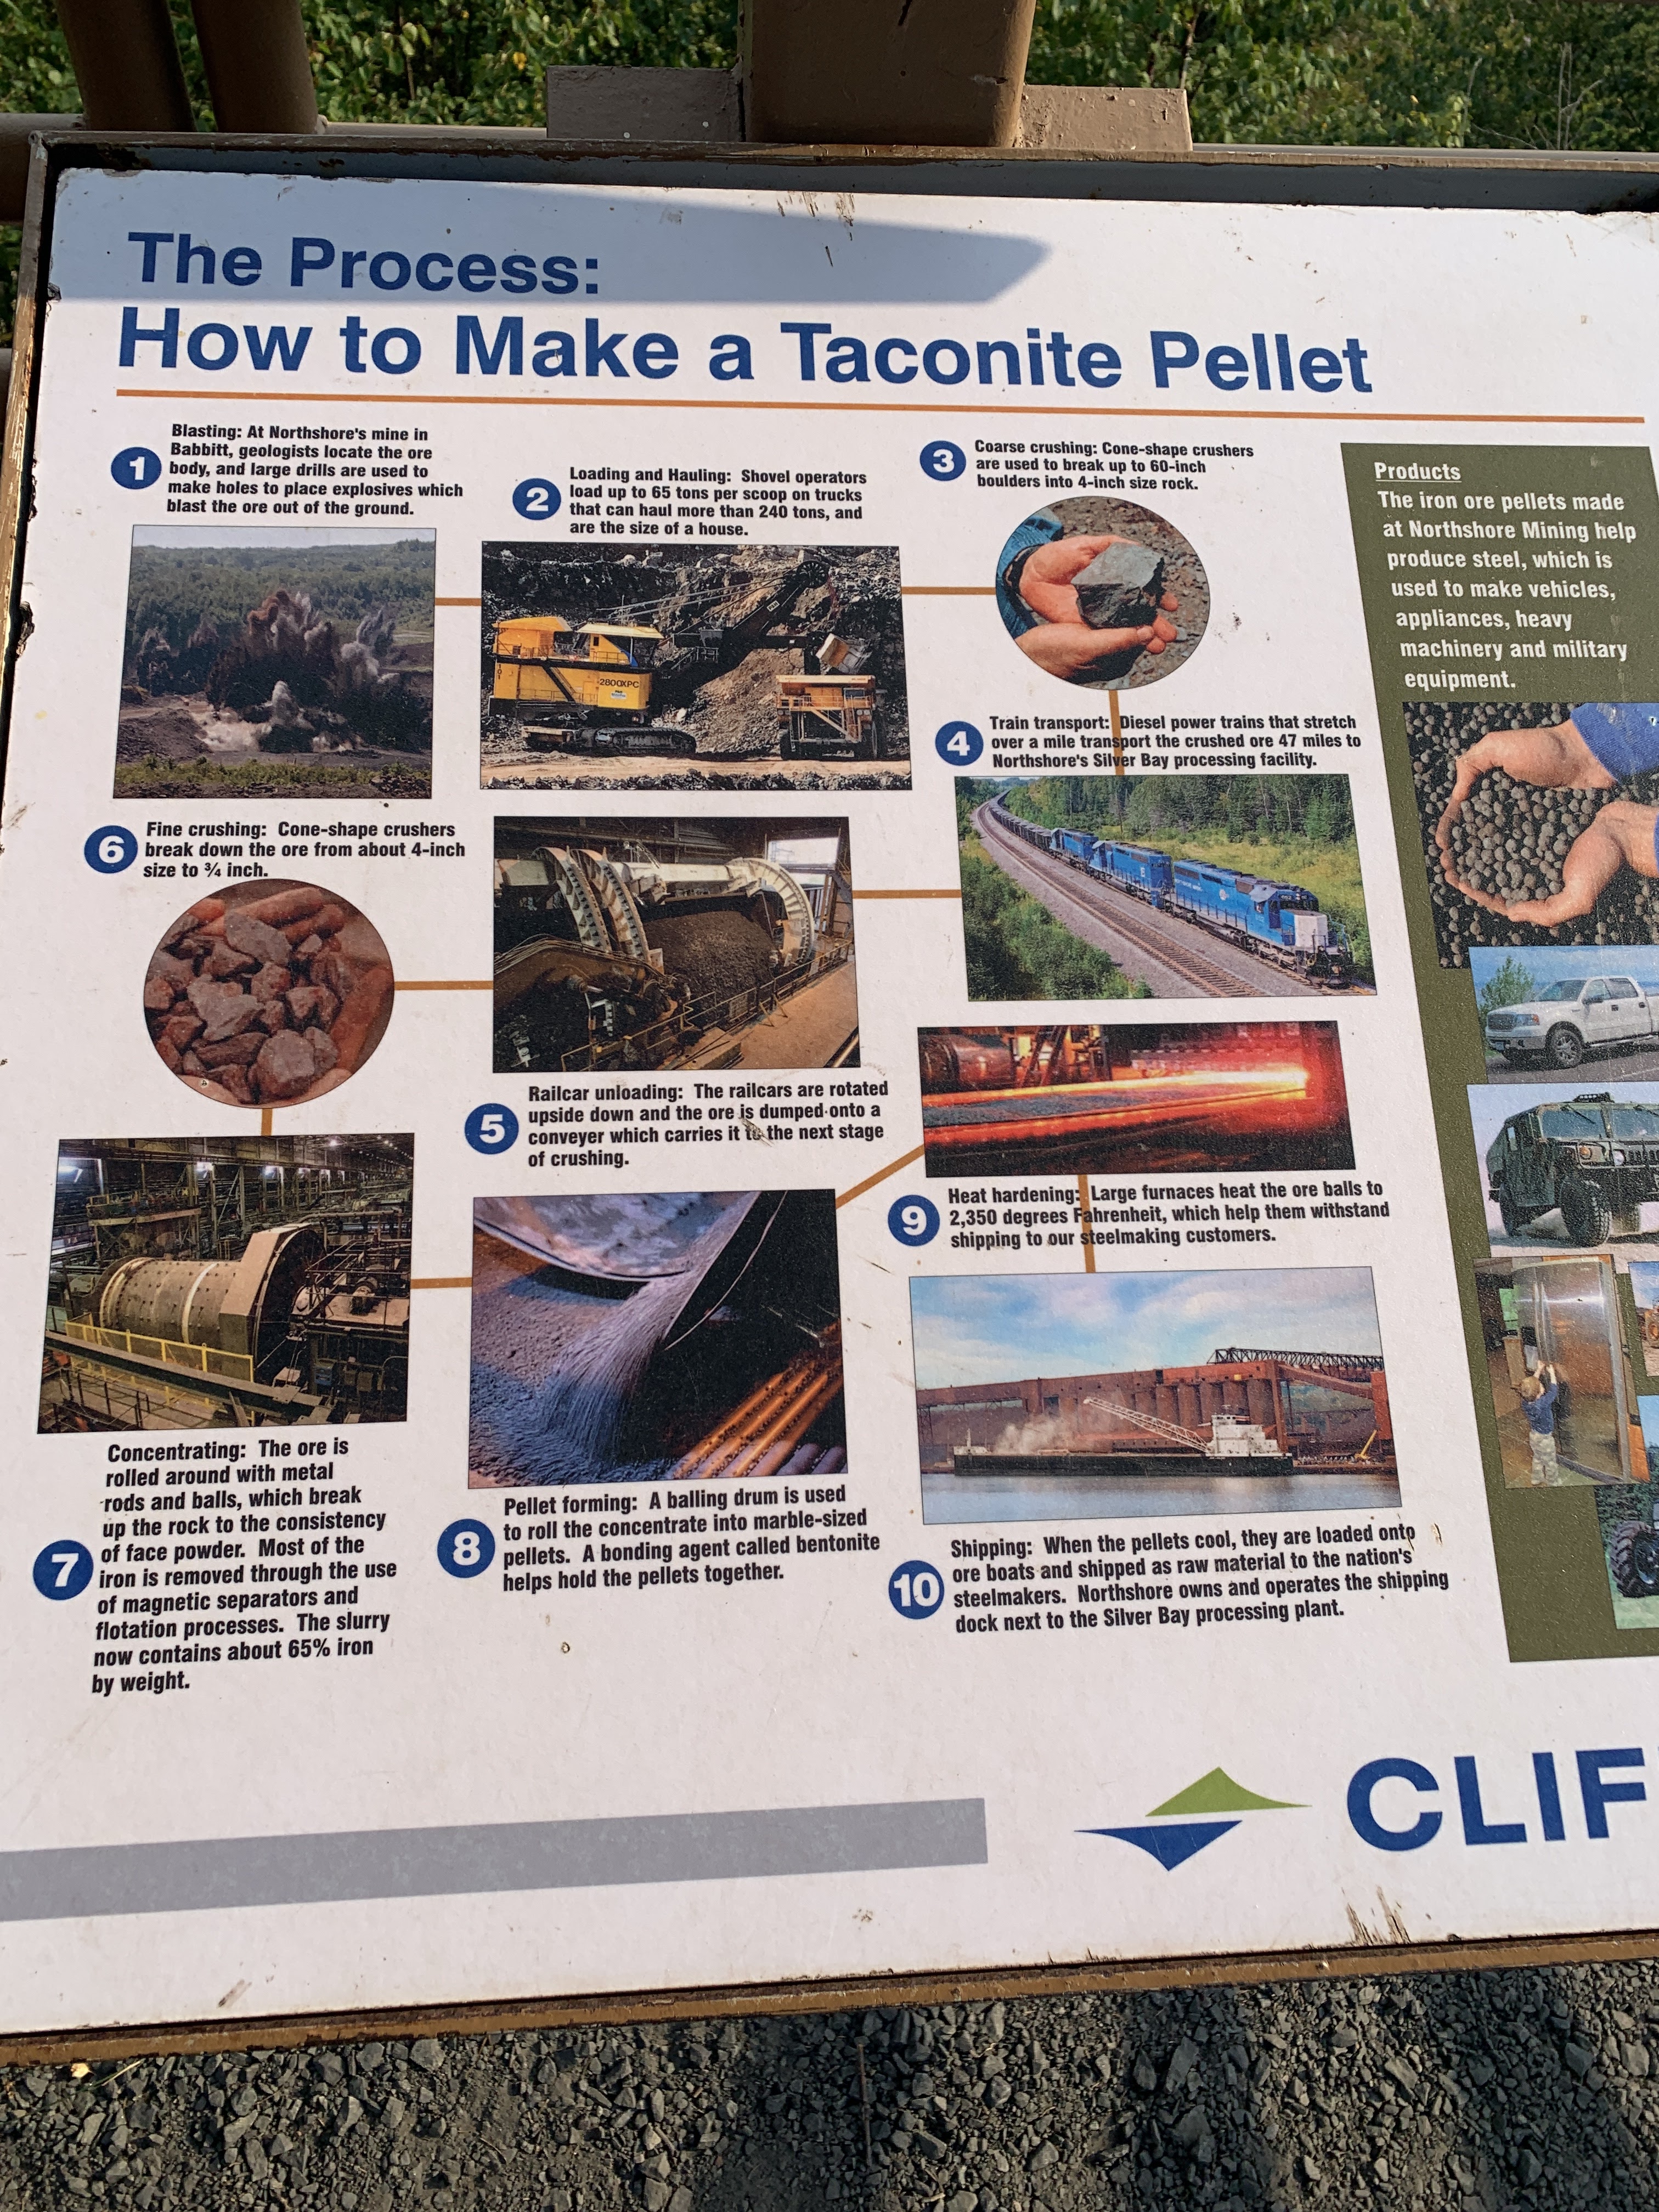
The first overlook had views of the taconite plant and lots of information of mining in the area.  I'm not going to rehash all the information about the plant, you can just read the signage in all the photos if you're interested.


Lake Superior View

The second overlook had views of Lake Superior.


The trails to get to these three different overlooks were beautiful in and of themselves.  When we visiting, there were so many wildflowers, and I loved all the birch trees.


City of Silver Bay View

Finally, the third overlook had scenic views of the town of Silver Bay.


The interpretative signage covered not just the history of Silver Bay, but also pointed out current points of interest as well.


There is a short-cut hike you can take that will get you back to the parking lot more quickly.  It is more rugged, but boy was it beautiful with all the wildflowers in bloom.


And that concludes my last post of this travel series.  I will be back next week with a few posts of our fall hiking adventures.

Have A Great Day!  Amy

Linking Up with these Fabulous Blogs HERE!

Tuesday, November 29, 2022

My October Bible Journaling Pages

I think October and November, and probably even December are going to be lean months for Bible Journaling pages.  I promise, I'm in the word daily and attending church and Bible Studies regularly, but Bible Journaling takes a lot of time, and with all the holiday hubbub going on right now, time is something I have precious little of.  Isn't it ironic that holidays are supposed to be set apart to remember and honor God, and yet those are the times we busy ourselves with so much "stuff" we do anything but that?  Do you struggle finding balance between getting all the holiday chores done and not forgetting the real meaning of the season?

Anyway, on to the meager six pages I managed to do in the month of October.

As I mentioned in last month's Bible Journaling post,  I finished reading and coloring in all the pre-printed images in the Inspire Bible, so now I'm going back and doing all the blank margins that are left in my Bible.  Some pages I use ephemera from Illustrated Faith Bible Journaling kits, and other pages I just use stuff I already have on hand or I google a free coloring Sunday school image and print it onto sticker paper.  This is a page I did using an image off the Internet and a sticker from my stash.

I chose this image of Daniel picking out stones for his fight with Goliath.  I wrote two Bible verses that David said or wrote himself, then I added my own thoughts about how I can trust the Lord because He is faithful.  All I have to do is look at past ways God has helped me, and then I can have the confidence that He will do it again.


This next page is an example of what you can do if you experience "bleeding" onto an opposite page.  This page had heavy bleeding from an illustration on the other side.  I covered it up by creating a background with leftover sticker paper.  I colored the sticker paper in all different colors, then cut the pieces randomly and attached it to the Bible page.  It covered up the bleeding beautifully and made quite the nice background if I do say so myself.  Then I used a variety of stickers to illustrate a verse that I found significant in my reading that day.

"Your life is safe in the care of the Lord your God".  How often do we worry about our lives, or the lives of our loved ones?  I worry about this a lot.  I always pray everyone I love will be safe and healthy.  Now even though this verse is specifically talking about David, I believe the Christian can apply it to themselves as well.  It doesn't mean we will always be healthy, safe from our enemies, or even spared from death, but it does mean that we are in God's hands.  Nothing will ever happen to us that He doesn't allow, and He will always be with us, caring for us, every step of the way.

This is another page I created using a free coloring book image off the Internet.  I printed the image onto sticker paper, colored it in, and cut it out.  Then I inked a background by sponging with yellow/gold ink.  I hand wrote the Bible verse 1 Sam 10:24 then I wrote some reflections of the chapter.

God never wanted Israel to have a king,  He wanted His people to always look to Him for guidance, not a man.  But Israel was relentless in wanting a king, because they saw that all the other kingdoms had kings and they wanted to be like those kingdoms:  Israel wanted to be like the world.  Do you see that same thinking in Christian churches today?  I certainly do.  Churches are becoming more and more worldly every day.  Instead of the church influencing the world, the world is influencing the church!  

God ultimately gave in to the Israelites worldly desires and gave them a king.  Saul started out as a very good king, but ended up being very bad.  God gave Israel a king to them to teach them through it.  Sometimes, we can ask God for things that we think would be good for us, but really are not good for us at all.  And sometimes God allows us to have what we asked for, to then teach us through it.


The next three pages all use ephemera from Illustrated Faith. I'm still using stuff from the same "Unyielding Hope" kit, and I won't open my next kit till this one is all gone...which might be a LONG time as there was a lot of stuff in this kit.

This page is a continuation of the page above, and continues to focus on how God uses our mistakes and sins in His plan for good.  The story of the people desiring a king, and how God used this desire of theirs to deliver the Israelites from their enemies reminded me of the verse Romans 8:28 "God causes everything to work together for the good of those who Love him'.  I built a page around that verse.

I thought the Bible story of Jonathan fighting the Philistines was a great place to use some of "Hope" ephemera.  The author of the kit defines " unyielding hope" as "shifting our focus from inward to upward" and "hope" as "a desire accompanied by expectation of or belief in fulfillment".  Jonathan was alone with just his armor bearer, but he believed in God.  He had hope!  He looked past his present circumstances and focused on God.  He said "Nothing can hinder the Lord. He can win a battle whether he has may warriors, or only a few."  And he did!  Jonathan and his armor bearer killed twenty men that day and panic broke out in the Philistine army and everyone was terrified.

By the Way...the "hope" ephemera at the top of the page that appears to be covering the words of the Bible, actually is not.  I only glued down the left side of the ephemera, so it can be lifted to see the words in the Bible.


My last page, which is on the opposite side of the page above, continues to illustrate this same story of Jonathan and the Philistines.  I wrote how God makes the impossible possible by jotting down some key points from this Bible story.  Then I remembered the chorus "God can make a way, where there seems to be no way" and wrote that down, highlighting it with a film frame.


I hope you enjoyed my Bible Journaling pages this month!

Have A Great Day!  Amy

Linking Up with these Fabulous Blogs HERE!


Sunday, November 20, 2022

A Thanksgiving Table Setting for Children Under Five

Every year I see all these beautiful tablescapes of holiday tables, and I envy them.  I would love to have a beautiful, elegant table to sit down at for Thanksgiving and Christmas.  It's not that I'm incapable of creating my own lovely tablescape.  No, I'm pretty good at holiday decorating if I do say so myself.  But my dilemma is I have three adorable little munchkins at my holiday table which I wouldn't trade for all the perfect, beautiful, elegant tablescapes in the world!  My grandchildren are what makes celebrating every holiday more meaningful.  So I decided, in lieu of the typical stunning Thanksgiving table setting you are seeing everywhere on Pinterest and Blogland right now, I'd show you what my Thanksgiving table looked like last year.

I covered the table with an old vinyl tablecloth that was way too small for our table, but it was the only one I had.  A cloth table cloth would just be ruined immediately with stains from the little ones, or my messy husband. 😁

Each table setting had a whimsical, hand-made item by me, whether it be a Thanksgiving figurine, or a paper turkey, plus a Thanksgiving Bible verse, and some corn nuggets (more on that later).


Last year I made these cute little pilgrim and Native American figures out of toilet paper rolls.  It ended up being my most popular post of the year,  even when I couldn't include directions because the link was broken.  Go figure.  The grandkids loved these little figures and played with them all week.


The paper turkey I made years ago following a tutorial on Splitcoaststampers. 


The Thanksgiving faith index cards I made two years ago and we have used them every year at Thanksgiving.  The kids love them and they bring a spiritual element to the table.  Each family member picks a card, then reads the Bible verse on Thankfulness on the front of the card, then they talk about what that verse means to them.  The experience takes it a little beyond just mentioning what you are thankful for, since for most of us that doesn't change much year to year (family, friends, health, job, etc.).  You can find more information on the Thanksgiving Faith Index Cards HERE!


Now about the little packet of corn;  our church has a Thanksgiving Eve service the night before Thanksgiving Day.  At the service, the pastor shared the hardships of the early pilgrims and how many had starved to death their first winter in the new land.  He said many pilgrims only had five kernels of corn a day to eat,  and we were sent home with little packets of five kernels of corn to remind us of the hardships of the early settlers and how much we had to be grateful for today.  

Now whether the story is true or a myth I don't know, but I love the lesson the legend can teach us today. 

Legend of the Five Kernels
Photo Credit

 I put the packets of corn on the grandchildren's plates so we could discuss the values we learned from the story during the meal.  The grandkids then decided to try and eat the corn 🤯😆,  so we had to quickly grab the corn bits away from them.  I think if I ever do this again, I would use candy corn.  😀

I have many different styles and colors of plates and cups already in my dining ware collection, and these jeweled toned plates and Harvest Gold glass cups are perfect for a fall table.


Fall paper napkins were used in place of cloth ones, once again, more practical with little ones.


And finally, prior to our Thanksgiving meal, I printed out some Thanksgiving scenes for the grandchildren and I to color.  This was one I colored in using Copic markers.  I displayed it on the hutch next to the dining room table.


I hope you enjoyed reading about how my family and I celebrate Thanksgiving.  I will be taking the week off in lieu of the holiday.  I will return November 29th with a Bible Journaling post.

Have a Great Day and a Happy Thanksgiving.  Amy

Linking Up with these Fabulous Blogs HERE!

Thursday, November 17, 2022

Layering Essentials for Fall with Ageless Style

Ageless Style is a monthly style challenge and link up for women of all ages.   Each month we pick a different theme and style an outfit based on that theme.  This month's theme is:  "Layering Essentials for Fall" and was picked by Joanne.


This November, the ladies of Ageless Style and I are showing  our "Layering Essentials for Fall".   There are so many ways to layer clothes in the fall:  scarves, jackets, cardigans, blazers, etc., but since "Shackets" are really trending right now, I decided to show two completely different ways to layer with a "Shacket".  One is a dressy option, and the other is super casual.


If you don't know what a "Shacket" is, it is a large, oversized, shirt worn as a jacket.  Some materials can be thinner, like the corduroy shacket I'm wearing in the picture above left, and others can be very thick and warm like the flannel above right which has a quilted lining.

Let's take a look at each shacket one at a time.


For my first outfit, I paired a lightweight corduroy jacket with a shift dress.


The burgundy shift dress has short sleeves so the shacket was perfect for keeping my arms warm in the cooler fall weather, but because it is lightweight, I wasn't too warm like I would be if I wore a cardigan.


The shacket has a nice long length in the back, so it will be perfect to wear with leggings too.


To complete the look, I wore tall brown boots, carried a black bag with brown straps, and chose a long beaded necklace and gold bracelet.


For my second outfit, I am showing a casual hiking outfit.  This fall day was much colder than the one above.  I wore a warm white turtle neck sweater under my shacket to keep cozy warm.


This shacket is more like an actual jacket because it has a quilted lining and is super warm.  I love to use this one at home to throw on quickly if I need to run outside.


I chose khaki pants, to coordinate with all the beige I had already going on in the sweater and the shacket.  And because it was so cold, I added a black beanie and white knit gloves.  Because we were hiking, I wore my Merrel hiking boots, but if I were wearing this on the street, I'd probably have such cute booties on.


 If you'd like to purchase either of these shackets,  I found the corduroy one HERE and the plaid one HERE.  I do not make any commission on your purchase, I provide the links for your convenience only.

And now, be sure to check out how the rest of the ladies are styling their "Layering Essentials for Fall" and link up your outfits with us below.

Have A Great Day!  Amy

Linking Up with these Fabulous Blogs HERE!

Amy ~ Amy’s Creative Pursuits

Blog | Instagram | Pinterest | Facebook |

Bo ~ Bo's Bodacious Blog

Blog / Instagram /Pinterest / Bloglovin'

Joanna ~ My Slice of Life

Blog

Jodie ~ Jodie’s Touch of Style

Blog | Instagram | Facebook 

Marsha~ Marsha in the Middle

Blog /Instagram

Mireille ~ Chez Mireille Fashion Travel Mom

Blog | Instagram | Pinterest | Facebook |

Rosemary ~ Distinctly Southern Style

Blog / Instagram / Pinterest / Facebook


You are invited to the Inlinkz link party!

Click here to enter