Showing posts with label sewing. Show all posts

Tuesday, May 19, 2020

How To Save Memories With A T-Shirt Quilt

Several years ago I worked full time as a manager at a fabrics and crafts store.  I worked there for six years and during those six years I purchased a lot of stuff!  I probably have enough fabric and scrapbooking supplies accumulated to open my own fabric and crafts store.  When I retired, I always planned on using that stuff;  after all, now I had all this "free time" to spend in the craft room.  But of course, the hours I thought I would have to spend in my craft room everyday was more like one or two hours a day.  Between cleaning, gardening, traveling, and home upkeep/remodel projects I really didn't have as much "free time" as I thought I would.

Years went by and I felt so guilty about all these unfinished projects gathering dust in my craft room.  I felt so overwhelmed by it all, that the joy of creating was taken away from me.  I finally realized I felt overwhelmed because the task was too big, and to make it less overwhelming, I just needed to make my goals smaller and more manageable.  At that time I had three quilts that I started but never finished.  I decided to make it my goal that I would finish one quilt per year.  I started with the simplest quilt of them all, and the one I had the most further along:  a T-Shirt Quilt.


Many years ago my daughter gave me all these T-shirts of her husbands.  They are all T-shirts of plays and dances my son-in-law was in when he was in high school and college.  The T-shirts are packed full of memories, some have the date on them.  The fabric on some of the shirts was so old it was fragile;  but once you iron on the interfacing it makes the fabric much stronger and stops it from stretching.


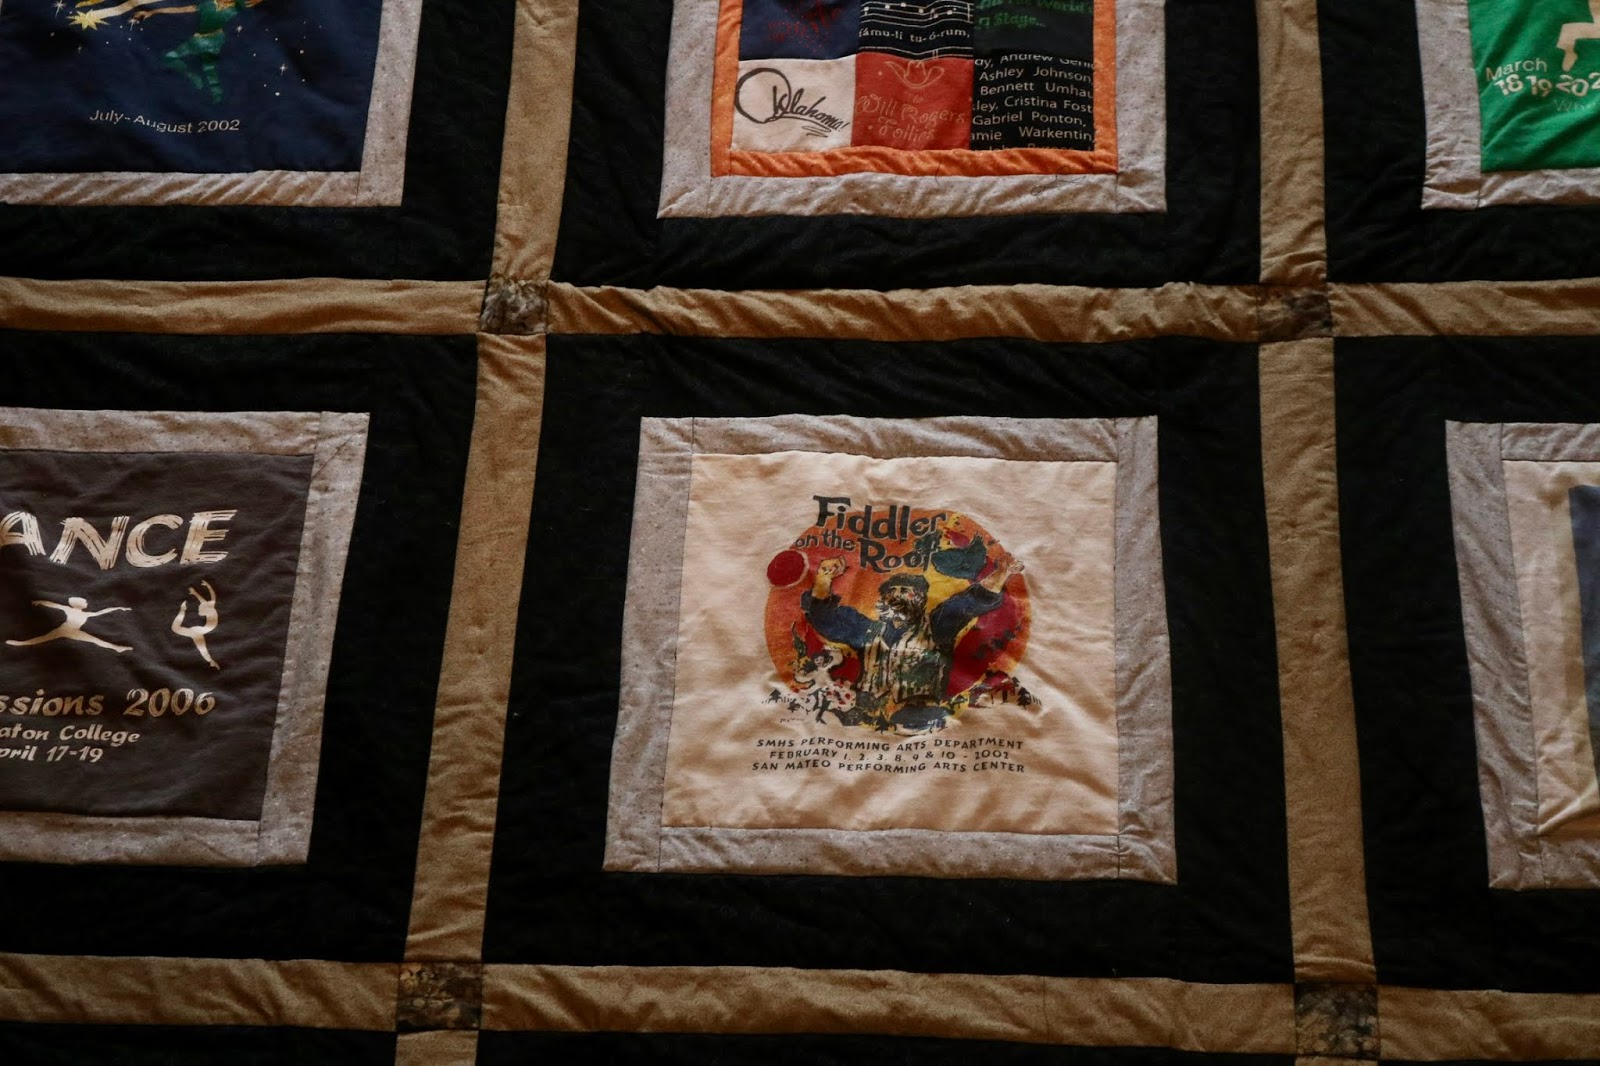
My T-Shirt quilt is a little different from most for it has traditional quilting borders.  Most are just T-shirt blocks connected together like THIS ONE.  That would be the easiest and quickest T-Shirt quilt to make.


I had a lot of T-shirts that had small graphics, so I cut them up to even smaller squares to make one block.  I put this block right in the center since it was so different from all the other blocks.  I love that my children's names are on these blocks.   My son-in-laws name is in the upper left corner and my daughter's name is in the lower right corner.  Isn't that awesome?  What a memory keepsake!


Now if you are a seamstress, you will probably notice how horrible my sewing is.  I will be the first to admit I'm a horrible quilter.  I so much more enjoy the process of designing a quilt than sewing one.  The mathematical precision of quilting drives me crazy.  I often thought I should stop trying to do traditional quilting and just do "Crazy Quilting".  I think that would be more my style.


Regardless of my imperfect sewing, I'm proud of myself for FINALLY completing my project;  and I did it all myself!  I even finished it myself with the "Stitch in the Ditch" method instead of paying a professional several hundred dollars to top stitch it.


If you're interested in making this type of a T-Shirt quilt instead of the standard style of just sewing the T-Shirts together, the most similar instructions I could find was this one HERE.  The pattern on this website would be much easier as it is only one border between the T-Shirts instead of the three borders on on my quilt.


T-Shirt quilts are a great way to preserve memories.  I've been collecting T-Shirts from every place we ever traveled too, and someday I hope to make a travel T-Shirt for myself.  I've also seen people use T-Shirts of sports teams or music concerts.  Oh, the memories you can save on a T-Shirt Quilt!


Have A Great Day!  Amy

Linking Up with these Fabulous Blogs HERE!

Tuesday, June 4, 2019

How To Quickly And Easily Add Belt Loops To Pants

For this week's craft post I thought I would show you a quick and easy way to add belt loops to your pants.  If you remember THIS POST I received some really cute pants from Stitch Fix.  I loved everything about them except for the fact that they didn't have belt loops.  I received several great suggestions from my readers of how to fix them.  In the end,  I decided to add my own belts the quickest and easiest way I knew how by using a $2.00 package of bias tape.  Watch the short two minute video below before looking at the "How To" photo tutorial.


Before I begin,  I'm going to take some time to explain what Bias Tape is for the non-sewer.  Bias Tape is a finishing fabric edge usually used on quilts, but you also see it used to give a finished edge on clothing.  Many seamstress make their own bias tape.  This is done by cutting the fabric on "the bias" so that it has some stretch to easily go around corners and edges.  Bias tape is available in many colors and styles at all fabric stores and any wear fabric is sold like Hobby Lobby and Walmart.  The bias tape I used is a "double fold" bias tape.

Finding an exact color match to the pants is impossible, but I thought I came pretty close.  The first picture is closest to the true color of the bias tape.  Some of the other photos the tape looks more light green than blue.


The first thing I did was measure and count the loops on another pair of pants.  In this case, I used a coral pair of pants I received in my June Stitch Fix box.  I then cut five strips of bias tape and sewed the long open edge shut.


Next,  using my coral pants as my guide, I pinned one end of the bias tape to the pants.


I repeated this five times.


I then sewed the bias tape on using the existing top finishing as my guide.   I went back and forth around 4 times to make sure the loop would stay on and tear if I tugged up my pants.


Once all the loops are sewed on once,  I then folded and pinned them down, and sewed the lower half.


To sew the bottom tab,  I top stitched right over the fold following the existing top stitching on the pants on my guide.  I then repeated the top stitching on the top of the loop.  Top stitching is important to flatten down your loops.  If you only sew from underneath, the loops will be bulky and stick out.  Plus, unless you hand sew your loops on,  it's almost impossible to sew underneath the bottom loop.


Now, if you notice I made my belt loops a lot smaller than the loops on the coral pair.  I did this on purpose.  I wanted to keep the loops on the waistband for strength purposes.  Of course, this means I can only wear a narrow belt with these pants, but that's OK with me.


This belt fit just perfectly through the loops and was all I needed to hold up my pants.


And here is a selfie of me wearing my pants with the new belt loops!  What a difference a belt makes!  Now I can wear my pants without them slipping down.  I have no idea why the pants did not come with belt loops in the first place.  They are a stretchy fabric, but any other pants I own that are stretchy have an elastic waist if their are no belt loops.


I hope this tutorial was easy to follow for you!  Let me know in the comments if you have any questions.

Have a Great Day!  Amy

Linking Up with these Fabulous Blogs HERE!

Tuesday, May 2, 2017

A Pinwheel Baby Quilt

 Over twenty years ago my husband's paternal grandmother passed away.  The family was going through her possessions to divide up among various family members.  One of the items they discovered was a box of old quilt pieces;  some cut into triangles, a couple embroidered hearts, fabric scraps, and one pinwheel block.  My mother-in-law (knowing that I sewed) asked me if I wanted them.  I thought the pastel, vintage-looking material was cute, so I said "yes" and I put them in a box hoping someday I would have time to finish "Grandma's Quilt".

Fast forward twenty + years later and those quilt pieces were still sitting in a box.  When I found out my daughter was pregnant with a little girl, I decided it was finally time to finish "Grandma's Quilt".

This is what was in the box:  small scraps of fabric, and pre-cut triangles.


There was only one finished block and this was it.  By looking at it, I knew she was trying to make a pinwheel quilt.


But I also found two embroidered heart panels.  Hmm, what to do, what to do.  I had no idea what Grandma's original plan was as I only had pieces of fabric and one finished block.  There were no quilt patterns in the box.  So I came up with my own design.


The original quilt block was extremely crooked, so I had to cut it down a lot.  Then I made a quilt block using the other fabric scraps in the box, plus some of my own white fabric from my stash.


I then made the rest of the pinwheel blocks using the pre-cut triangle pieces.


 A pinwheel quilt is one of the easiest quilts to make.  Although I was vaguely familiar with how to make one, I just googled "How to Make a Pinwheel Quilt" on the Internet to refresh my memory.  There are loads of great videos out there.  If I can make one, you can too!


It was a coincidence that the colors of Grandma's Quilt pieces just happened to be the colors my daughter chose for her baby's layette:  pink and teal.   Or was it a coincidence?  Sometimes I think these things happen for a reason and are not coincidences.


After all the blocks were made, I laid them out in a pattern I liked.  I did make a mistake that I would correct if I had to make the quilt all over again:  I would have turned the bottom of the top heart block out so it was facing in the opposite direction.  Unfortunately I didn't recognize my mistake till the whole quilt was done.


Once I decided on my layout, I just started sewing the rows together.


This is what the quilt looked like after all the pieces were sewing together before it was quilted.


Using an old piece of pink polka dotted fabric from my stash (sorry, I forgot to photograph the back of the quilt and I already gave it to my daughter) and some quilt batting (also from my stash), I then began quilting the three pieces together.  I did the "Stitch In A Ditch" technique to keep it simple.

I then cut my own bias tape and finished off the edges.  Because I was lazy and I didn't want to hand sew the bias tape on, I added a pretty lace trim from my stash to the edge  of the quilt.


Here are a few close ups of the lace on the edge of the quilt.


This quilt cost me nothing to make since I used items I already owned.  I love that this quilt has so much history to it and that two grandmothers had a part in making this quilt.  So much love and history has gone into it.  

Have a Great Day!  Amy

Linking Up with these Fabulous Blogs HERE!

Tuesday, August 23, 2016

How To Make An Owl Pot Holder


I have been noticing that all of my kitchen pot holders either have a hole in them or are quite grungy.  At first I was just going to buy new ones, but then I decided that since I had enough fabric in storage to open my own fabric store that I would just make a few.  I had an old Legacy pattern (which is still available for purchase HERE),  laying unopened for years, so I decided to give it a try.


Isn't this pot holder design just so cute?  Now, I've included the link to this pattern above, but anyone could make it without the pattern as the design is just so simple.  Here is a picture of the pattern and examples of other owl pot holders.


 The pattern comes with these shapes that you just trace onto fusible webbing and cut out.  If you already have a standard pot holder in your kitchen, you could use that to get an idea of the sizes of your shapes.  It's pretty much just a triangle for the head/nose, three round shapes for the eyes, and two ovals for the wings.

 For all the non-sewers out there, fusible webbing is an interfacing that seamstresses use in appliqué projects.  One side is sticky once ironed, and the other is not.

I just laid down my fusible webbing and traced the shapes onto the webbing with a pen, then I cut all the shapes out.


Now for the fun part;  choosing the fabric.  Like I said earlier, I already have a lot of fabric, so I just looked for three coordinating fabrics in my stash, plus black and white for the eyes.

I chose this pretty butterfly fabric for my back and body of the owl.


I cut two squares with rounded corners for the front and back of the potholder using my fusible webbing as my pattern.


Now to cut all the fun shapes.  Four circles of black fabric were cut for the eyes (two large and two small), and then two white fabric circles too.  I used a solid blue fabric for the wings and a solid orange fabric for the beak/head.

I simply ironed the fusible webbing pattern pieces directly onto the fabric, then cut out all my shapes.


Once everything was ironed on and cut out, I arranged my shapes onto the front of the pot holder.


Now it gets a little tricky for the non-experienced sewer:  appliqué!  If you never appliquéd before, it's basically a zig zag stitch around the edge of your appliqué to adhere it to your fabric.  The hardest part is getting the zig zag just right.  I had to practise with scrap fabric and play with both the length and width of my zig zag stitch settings till I found one I liked.  Every machine is different, so you just have to play around with scrap fabric till your comfortable to move onto appliquéing your project.

I pinned my piece only in the center so I could appliqué around the piece freely.


I had to change thread colors a lot, which was a pain, but it is worth that extra step if you want to pot holder to look nice.  Here is the pot holder with the pieces appliquéd on.


And here is what it looks like on the other side;  which you won't see once the pot holder is finished.


The next stop is to add your Insul-Bright.  This is what you need to keep your hands from getting burned!  Insul-Bright is a insulated lining that is used inside fabric to keep items hot or cool.  It's used to make pot holders, casserole carriers, and grocery bags to name a few!  You can buy Insul-Bright at any fabric store.


I cut one piece of Insul-Bright to fit inside my pot holder, then I basted the three pieces together.


Now for the hardest part, finishing the edges.  To do this you will need bias tape.  You can buy bias tape or make your own.  I made my own because I have a lot of fabric and I did not have the size or color of bias tape I needed in my stash.  Even though making bias tape is pretty easy, it's even easier to buy it, so I recommend that!

I won't get into how I made my bias tape, for that's a whole other tutorial.  There are plenty of YouTube videos and other tutorials on the Internet of how to make bias tape if you need to make your own.  Just remember, the key is to "cut on the bias", that's why it's called bias tape.  Even though I've made bias tape before, I forgot how to do it and ended up cutting it wrong.  When I went to put it on my pot holder, it didn't work because the material didn't stretch.  Bias tape has to stretch or it does not work for rounding the corners of the pot holder.


Once my bias tape was cut properly, it went on fairly easy.  I pinned the bias tape in place like this. In hindsight, I should have started my bias tape in the top center because the seam would have been covered up by the holder.


To get a finished edge, tuck one of the bias tape under the other end.


Then fold over the edge of the other end and pin it on top of the tucked in end.


Once it is all pinned, just sew close to the edges.

If you want a holder, just cut a smaller piece of bias tape, fold the edges under, and sew to the top of your holder.


So what do you think, pretty cute eh? But I have to admit, it was a lot of work for a pot holder, especially considering how dirty they get.  However, I enjoyed doing it and I saved myself money because everything I used to make it was already in my stash.

I do plan on making more pot holders.  I was thinking of making some fall or Halloween ones.  I have so much fall fabric!  But maybe, I'll just keep it simple and just do a standard square.

Have a great day!  Amy

Linking Up with these Fabulous Blogs HERE!