Thursday, December 16, 2021

"Holiday Wear for the Whole Family" with Ageless Style

 Ageless Style is a monthly style challenge and link up for women "over a certain age".  Each month we pick a different theme and style an outfit based on that theme.  This month's theme is "Holiday Wear" and was picked by Carrie.

As I stated on Monday, both styling groups I belong to picked the same theme "Holiday Wear", so I had to come up with not one, but two outfits.  On Monday's post, I shared how you could take ordinary dress up clothes from your closet and with accessories instantly turn them into holiday wear.  Today, I am showing off my grandchildren and holiday wear for the whole family!


On Monday I mentioned that I don't like to buy clothes specifically for a holiday that can only be worn one day out of the year.  But I was shopping at JCPenney with a friend and she spotted this beautiful, winter white bejeweled sweater for only $17 and she tempted me to try it on.  I was hesitant, as I didn't think the raglan sleeve style would look good on me, but when I tried it on, we both loved it!  And to an even greater surprise when I got to the register it rang up for only $13.00.  Score!  I guess I don't mind buying holiday clothes if they are that cheap.  Plus, I think I could wear this all winter long and not just at Christmas.  


I paired the sweater with bright cherry red pants I already owned and black suede booties.


The sweater has a nice length and is so soft and cozy.  And guess what?  It's still available HERE!  I'm wearing a size Medium for reference.  


I love the mock turtle neck and the jewel embellishment.  To complement the rhinestones in the sweater, I wore pearl and silver earrings.


And now as promised here are my little ragamuffins.  I know I say it every year, but they are my favorite gifts around the Christmas tree.

 
This is my oldest, Alethea, who's four.  She is looking darling in her red taffeta dress, white stockings, and silver shoes.


Alethea's Christmas dress is second hand.  There is no need to buy a brand new dress from the store every Christmas.  There are always plenty of friends, and relatives who have old dresses from when their kids were little that they would happily give away.  My daughter also found lots of great formal used clothing for very inexpensive prices on her local "Mom's Group" page.


The newest member of the family is Elisha.  Isn't he handsome in his black trousers, gingham dress shirt, and red Christmas vest?

And finally, my little man Atticus, who is two.  My, has his personality come out!  He used to be so shy and it would take 24-48 hours for him to warm up to us every time we saw each other again.  But now he's very out-going, talks a mile a minute, and we don't need to get re-acquainted every new visit anymore.  He's as handsome as ever in his dark trousers and red plaid shirt.  


The boys outfits came right out of their closet.  Again, you don't need to buy special Christmas clothes.  Just find something they already own in a Christmas color and build an outfit around that.  Every year, I decorate the tree a different color.  For our annual Christmas photos,  I tell my daughter what the color of the tree is and we put together a color theme to match the tree.  I love how cheerful the red and white looks and the black is the perfect accent color.


And now, lets see what the rest of the ladies in my group are wearing this Christmas and be sure to link up your outfits with us below too!


Amy ~ Amy’s Creative Pursuits

Blog | Instagram | Pinterest | Facebook |

Bo ~ Bo's Bodacious Blog

Blog / Instagram /Pinterest / Bloglovin'

Carrie ~ A Simple Lovely Life

Blog | Instagram Pinterest | Facebook |

Daenel ~ Living Outside the Stacks

Blog | Instagram | Pinterest | Facebook |Twitter |

Joanna ~ My Slice of Life

Blog

Jodie ~ Jodie’s Touch of Style

Blog | Instagram | Facebook |

Leslie ~ Once Upon a Time and Happily Ever After

Blog | Instagram | Pinterest | Facebook |

Marsha~ Marsha in the Middle

Blog /Instagram

Mireille ~ Chez Mireille Fashion Travel Mom

Blog | Instagram | Pinterest | Facebook |

Robin ~ Hello I am 50ish

Blog / Instagram / Pinterest / Facebook


Have A Great Day!  Amy


Linking Up with these Fabulous Blogs HERE!


You are invited to the Inlinkz link party!

Click here to enter

Wednesday, December 15, 2021

Exploring the Great West: Day Five, Part One: The Petrified Forest Trail

This is a continuation of a travel series to The Great West.  To start at the beginning, go HERE,, HERE, and 
HEREHEREHERE,, HEREHERE HERE, and HERE!

On the very last day inside Theodore Roosevelt National Park, we attempted to hike the Petrified Forest Loop.   I say attempted, because we were prohibited to hike the entire loop for we were thwarted by two buffalo!  But more on that later.

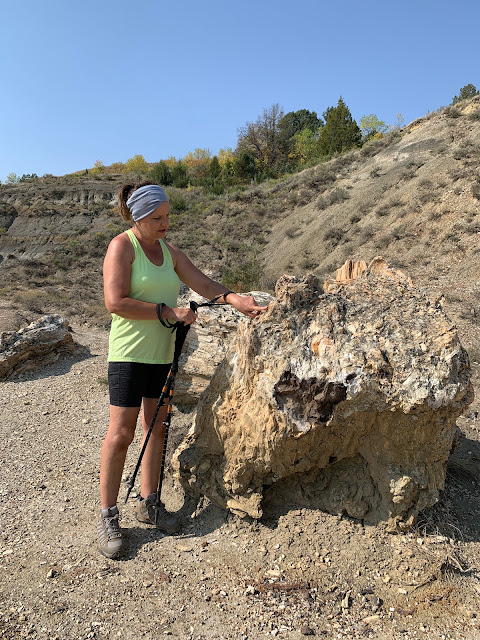
Me examining a piece of petrified wood

The biggest challenge of getting to the Petrified Forest is finding it.  You actually have to drive outside the park, and then thirty minutes on private gravel roads with very little help from road signs.  GPS does not work out there, so don't plan on using that.  They do give you very explicit instructions at the Visitor's Center on how to find the Petrified Forest.  You have to follow it exactly or you will get lost.  We found it with no problems on the way there, but we did get lost coming back out with no reverse directions.

While driving to the Petrified Forest, we spotted this pretty pronghorn deer.


If you think the park is desolate, the Petrified Forest is even more so!  Most people don't want to drive on gravel roads that long to get there.  But we did see a few crazy hikers, plus a couple on horseback.


Now the Petrified Forest is a 10.4 mile loop.  There are two sections of Petrified Wood on the trail with a connecting trail inbetween.  We did plan on hiking the entire loop, but after viewing the South Petrified Forest, we came across two buffalo.  One buffalo was sitting right on the trail, and the other was standing a few feet away.  At first we planned to give them a wide berth by walking off the trail, but because there were two of them, there was really no place for us to walk by.  So we had to turn around and go back the way we came.

We still got to see the North Petrified Forest.  We just walked back to the connecting point of the trail and headed north.  It really wasn't too bad.  When we did the math, we figured we shaved off about three miles from our hike without doing the loop.


It is 1.5 miles from the parking lot to the start of the trail.  And this part is a bit steep as you are climbing to get up on top of a butte.  Once you are on top, it's very level and you are pretty much walking through a beautiful prairie land.  

It is definitely buffalo land, and you see their patties everywhere!  But because it was so open, I wasn't that nervous for I could see very far ahead of me and could easily spot a buffalo.


The prairie land is very pretty.  There are stunning buttes in the background.  We ran into another hiker on this trail and he said "Who knew North Dakota was so pretty?".  He is so right.


In the picture below I am standing at the top of the butte.  We are still not at the start of the trailhead yet.  If you look below me, in the center of the picture, you can see cars parked in the parking lot.  That will give you some idea of how far we already walked and how steep the climb is.


We got on the trail and were surprised to find spots of fall foliage in a more desert landscape.


The South Petrified Forest

There were no signs saying we arrived at the Petrified Forest, but we knew we were there when we spotted all the petrified wood.


I thought the South Petrified Forest was prettier than the North Petrified Forest because of all the wild flowers.  However, the North Petrified Forest had more petrified wood and incredible geological formations.


The South Petrified Forest was like a small sandpit surrounded by evergreens and even greener landscape in the background.  


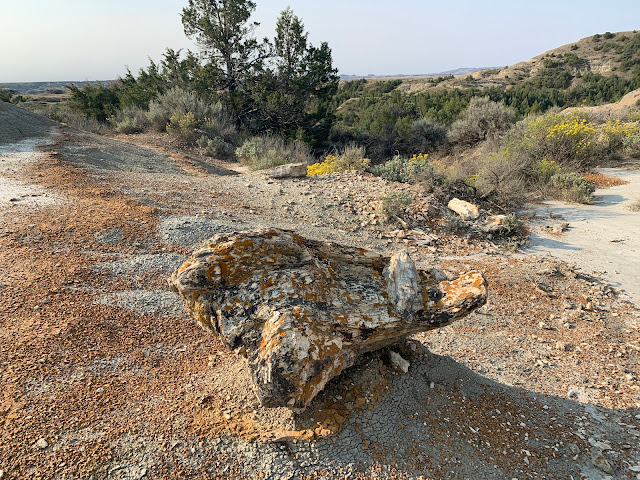
The petrified wood can sometimes look like rocks or boulders, but a closer look reveals the wood pattern.  They are as heavy as a rock, that's for sure.  My husband picked one up that looked like a log you would throw in the fireplace.  He said "When you pick it up, you expect it to weigh what a log weighs, but it's as heavy as lifting a boulder."

I thought there were some beautiful sand colors in many of the geological formations that reminded me of the Painted Canyon.


Well, after viewing the South Petrified Forest we were about to hike the 2.5 mile connecting trail to the North Petrified Forest.


 We had to first climb up another steep hill to reach the top of another butte.


And when we reached the top, that's when we saw them.  Now what do we do.  We really didn't want to turn around.  So, we decided to keep walking toward them and give them a wide birth.  One buffalo was sitting right on the trail.  The say to keep 25 yards away from buffalo, that would mean we would have to walk 25 yards off the trail in the grass.  We decided to go for it, but I must admit, I was terrified.  And then the big buffalo stopped eating, and stopped wagging his tail, and looked up at us.  We did not like the look in his eyes, so we did an about face and went back the way we came.

I really wasn't too bummed about it.  I was prepared for this to happen eventually because in all the park reviews almost every hiker came across buffalo and couldn't complete one of their hikes.  I don't think it would have been that exciting of a hike anyway as the connector trail is basically just walking a flat prairie.  


So we decided to return to the start of the trail, and then head over to the North Petrified Forest.  I was surprised at what a short walk it was back to the start of the trail.  The longest part really was from the parking lot to the start of the trail.


The views seemed even more pretty on the return trip.  I don't know what it is, I always prefer loops than one ways on hikes, but you always seem to see things differently and/or get a different view than you did on the way there anyway.


The North Petrified Forest

If you don't want to do both trails nor hike the 10 mile loop, you can just pick Petrified Forest to view.  If petrified wood is really your thing, I would go to the North Petrified Forest as it definitely has the most petrified wood.  But I do think the South Petrified Forest is prettier.


Theodore Roosevelt National Park is home to the third largest concentration of petrified wood in the nation.  These geological wonders allow hikers to travel back to a time when, instead of buttes and prairies, the landscape was dominated by massive trees and shallow swamps. 


In the photo below is an entire petrified tree that fell down and then was fossilized.


In addition to petrified wood, the North Petrified Forest has lots of other interesting geological formations.


The North Petrified Forest also offers a scenic view of the badlands.  Notice all the petrified wood stumps in the foreground and middle of the picture?  They can blend right into the landscape like boulders.  If I had little kids with me I would have played a game "Who can spot the most petrified wood" as it can be tricky!


It can be hard to get an idea of how big some of these petrified wood stumps are until you put a person in the picture.  This stump was one of the biggest ones we found.


The petrified wood is so fascinating to see up close and examine.


There is a petrified wood stump that looks like it's teetering on top of a small butte.


As we were just about at the end of exploring the North Petrified Forest hubby spotted the biggest buffalo we had seen on our trip yet.  He was quite a distance away, but because he was so large, we decided it was time to high tail it out of there!


When we got back to our car, there was still a lot of day light left, so we decided to return to our hotel and freshen up a bit, then grab some lunch and explore the town of Medora.  I will share that post in two weeks and it will complete this series.

Have A Great Day!  Amy

Linking Up with these Fabulous Blogs HERE!
 

Tuesday, December 14, 2021

A Handmade Nativity Scene for Children

I am SO EXCITED to share with you today a handmade nativity scene I made for my grandchildren.  It all started with last month's Thanksgiving figures.  I made two pilgrims and two Native Americans out of toilet paper rolls (you can see that post HERE).  I got so many comments on Facebook over those figures, and a lot of hits to my blog.  I couldn't believe how many people loved them.  Well, hubby suggested I try my hand at a nativity scene.  I was like "Yeah, right!  Like I have time for that!".  ðŸ˜„ Well, it turned out for some reason I'm really on top of things this Christmas season, and I truly did have the time, so I gave it a shot.  Once I started, I was having so much fun, I couldn't stop.  It took me three days (not a full three days...three days in-between all the other stuff a homemaker does during the day) and this is what I came up with.


All the figures, with the exception of the animals in the diorama background, were made out of toilet paper rolls.  I cut the background animals with a Cricut machine and then glued them at different distances to the back of the box.


I purchased absolutely nothing to make this nativity scene.  Everything I used I already had in my stash.  Colored card stock was used for all the toilet paper figures, but I also used felt for their head dresses and beards.  Even the manager was made from a toilet paper roll that I cut in half, using one half to make legs for the manger. Baby Jesus is just rolled up white felt with a pink circle glued on for His face.


The manger was made from an old shoe box.  That was actually the hardest part of the whole project.  I first just wrapped the paper in brown Kraft paper, but it kept tearing and looked terrible.  So then I just kept added pieces of brown card stock over the Kraft paper till I got a look I liked.  I had to keep using different shades of brown because I didn't have enough of one color, but I'm glad it worked out that way, cause I love how it turned out.

The Bethlehem Star I googled off the Internet and printed out.  I then traced it onto white glitter card stock, cut it out, and glued it to the stable.  I created a roof line to the shoe box by just gluing strips of brown paper to the box.  I made it look like the star was hanging above the manger by taking the same color card stock as the roof line (it's very thick paper) and bending it twice gluing it once to the star and once to the box.

The angel body was made with white glitter paper.  Her wings are a paper doily folded in half.  Her halo is gold metallic paper.


The three Wisemen were so fun to make.  I used glitter paper for their robes and gifts, and metallic gold paper for their crowns.  The camel was the only item I actually used a pattern for.  I found it on Pinterest, but the instructions were in another language, but I knew what to do by just looking at the pictures.  The humps are filled with quilt batting, and that's felt over the top.  The humps are just stuffed through the tubes.  The head and body I printed out on the computer and cut out and just glued to the tubes.  I added google eyes to all the animals because I knew the grandkids would love that.

 
The only other two animal figures I made were a horse and a sheep.   The horse is made with paper only, but for the sheep I used white felt and cotton balls to give her some fluffy texture.


For the shepherds, I used paper for all their robes, faces, staffs, and the sheep one shepherd is holding.  Felt was once again used for their headpieces and beards.

Every Christmas Eve we read the Bible Story to our grandchildren before we open presents.  This year, I think I will do a little re-enactment using this nativity set as Grandpa reads the story.  But I hope my grandchildren, with careful instructions, will play with the set on their own too.  I'd love to have them imagine the story of Jesus' birth in their own creative play.  I grew up with a ceramic nativity scene in my house.  I remember many Christmases laying on my tummy, under the tree, playing with the nativity scene.  As a result, that ceramic set got chipped and broken and eventually thrown away because too many pieces were lost.  This one, even though it took time to make, costs nothing to make, so it will be more kid-friendly to play and learn with.

Sorry, I don't have any template or instructions to share.  One reader suggested I make a tutorial, but I'm only a hobby blogger and it would take so much time to draw, upload templates, and write instructions for you all.  Honestly, I really just looked at photos on Pinterest, and started cutting and gluing paper until I got the look I wanted.  There are so many toilet paper roll ideas on Pinterest.  Many of those are Etsy sellers who want to sell you a pattern to download and print out.  I didn't want to buy a pattern, and I didn't think I needed one, so I just eyeballed everything.

However, you can find the camel pattern HERE.  That one was free.  And you can find more toilet paper roll ideas on my Pinterest page HERE.

Have A Great Day!  Amy

Linking Up with these Fabulous Blogs HERE!