Showing posts with label remodeling. Show all posts

Sunday, April 13, 2025

My Newly Redecorated Family Room

This is a post that is five years over due but I can finally say that the Family Room Make Over we started half a decade ago, is FINALLY FINISHED!  Hip Hip Hooray!

Quite often I wish I could live in an HGTV world where in a period of thirty minutes a room could be transformed, but realistically that is not life.  Over five years ago my husband and I decided to redecorate our family room because with my daughter's growing family, we really needed a fourth bedroom and more living space for us to gather as a family comfortably.   You can see the BEFORE project HERE,  where I share all the construction details of the new bedroom within the family room, and then you can see how we made small changes HERE that we lived with for five years before we completed it this year.

We began the project in the winter of 2019 before Covid arrived.  We just finished the bedroom portion of our new room when we had to stop because my husband's hours were cut from five days a week to four and with all the uncertainty going on in the world, we weren't even sure how much longer he'd have a job.  We lived with the room as is for five years.  Eventually we did purchase a new tv stand and coffee table, but kept the same rug and furniture.  Below is the BEFORE photo.


The BEFORE wasn't terrible.  The rug was dated, and the furniture had seen better days.  The real issue, is when nine people wanted to gather in the room to watch a movie there wasn't enough room.  We knew we needed new furniture but we could not figure out how to fit it in such an oddly shaped room with only one and a half solid walls.

Finally we decided the only answer was to flip the room because all the wall space was on the other side.  We didn't think we could do that because the tv would be above the balcony railing and we thought it would look odd.  But out of desperation, we decided to try it, and discovered, it wasn't that bad.

Here are the AFTER photos with the room flipped and a new sectional


We could not believe what a difference flipping the room made.  It created so much more space.  The small room now felt open and spacious and we could suddenly fit a sectional that comfortably seats six to eight adults, and even more little kids!

This is the view as seen from the bedroom.


I purchased  a new painting as my old ones were both vertical and I wanted one large horizontal painting.  It turned out this landscape painting from Hobby Lobby was not only the perfect size but it contained all the colors in my new room too. 


I had to get rid of my large end tables because they no longer fit in the room but now I had a lighting challenge as I couldn't have table lamps.  I solved that problem by hanging a Rattan Pendant Light in one dark corner and two floor lamps in the other corners.  We also have overhead lighting but we rarely used it.


I love the shadow designs my new rattan lamp projects on the wall.

The clock is also from Hobby Lobby.  I keep feeling this wall needs something else, but I haven't decided what yet.  Any suggestions?


It just so happened that our old Smart TV died right before we decided to flip the room.  At first, we were bummed as it was not that old, but when we got a new one, guess what?  It is completely wireless and doesn't require cables!  That means we could put it anywhere in the room!  So it ended up being a blessing in disguise as I don't think we would have been able to flip the room otherwise.

Now how do I feel about the tv not being up against the wall?  I don't like that if you're downstairs and look up you can see the back of a tv.  But you know how many times I've done that? Once, when we first moved the tv.  I haven't even noticed it since.  And another benefit was that I can watch tv during the day without the sun reflecting on the tv because the tv's back is facing the sunny windows.  So it is a win win!


I recently adopted two new little kittens so I put this sticky plastic on the bottom portion of the new furniture and on the sides that I know cats like to scratch.  I then covered up the sides with throw blankets, and so far, it's worked.  The new kittens have not ruined my new furniture.


We decided on wall-to-wall carpeting because we have four small grandchildren and we were always worried they would get hurt on the hard tile when wrestling (three of them are boys).  I chose a light grey color to contrast against the dark grey furniture and brighten the room up a bit.


The tv wall seemed kinda empty with just the tv stand, so I added a quilt rack to display some of my quilts, a basket to hold extra throw blankets, and a tall straw vase that holds tall dried flowers.


We couldn't fit all the pieces of our sectional against the wall, so we had to put one portion in the corner by itself.  We knew before we bought it that this would be the case as we measured very carefully before purchasing.  I actually really love this cute reading nook!


I'm able to fit two quilts on this rack, but you can only see one, the other is behind it.


If you're wondering where I purchased my furniture, I took a risk and bought it from Wayfair.  I was terrified of buying furniture that I never sat on, but it ended up being one of the best purchases I ever made.  We spent an entire day going to furniture stores in our town and there just was nothing that was working with our measurements, plus there were long wait times and huge delivery fees.  We spent $1000 less buying from Wayfair and paid $0 for delivery.  My only advice if you buy from Wayfair is to read EVERY SINGLE REVIEW and MEASURE carefully.  We felt the reviews were spot on!  This is such a popular sectional it is sold out in all colors but beige, you can see it HERE!

Have A Great Day! Amy

Linking Up with these Fabulous Blogs HERE!


Sunday, February 6, 2022

A Laundry Room Refresh

Every winter I like to do one home interior project.  I have gone through my entire home refreshing every single room.  All that is left after this winter is my kitchen (I am not looking forward to that) and my upstairs hallway.

This year's project was my laundry room/pantry.  First of all, I could JUST KICK MYSELF, but I have no "BEFORE" pictures to show you.  This room was such a disastrous mess and I was in such a big hurry after Christmas to clean it up, that I forgot to take "BEFORE" pictures.  So please forgive me.  In a way, I'm happy I don't have "BEFORE" pictures because it would have been too embarrassing:  it was a nasty, ugly room no one wanted to spend too much time in!  So in lieu of "BEFORE" pictures, I will give you a "BEFORE" description.  

The room "BEFORE" was painted a bright yellow on the walls and the cabinets were a slate blue.  It was all flat paint so the walls became very dirty over the years.  I'd come in from the garden to wash my hands,  turn on the light switch (covering the area with smudge as I flipped the switch) and wash my hands in the basin.  I never cleaned this room since we moved in.  There were cobwebs everywhere!  When I cleaned it up for renovating I even found a dead mouse behind the refrigerator and a snake skin on the shelf.  YUK!  I'd hate to meet the snake that left it behind.  The walls were covered with old sentimental artwork I didn't want to get rid of ( I finally parted with it!), gift bags, tubes of craft glitter glue, old cards and newspaper articles tacked to the walls...oh my gosh, it was a horrible mess!  It was so over-flowing with crap there was only a foot of walking space to get to the refrigerator and if I wanted to reach something on a shelf, I had to get out a ladder because there was too much stuff on the floor.  I finally reached my breaking point and said "ENOUGH! I have to clean this room up!"

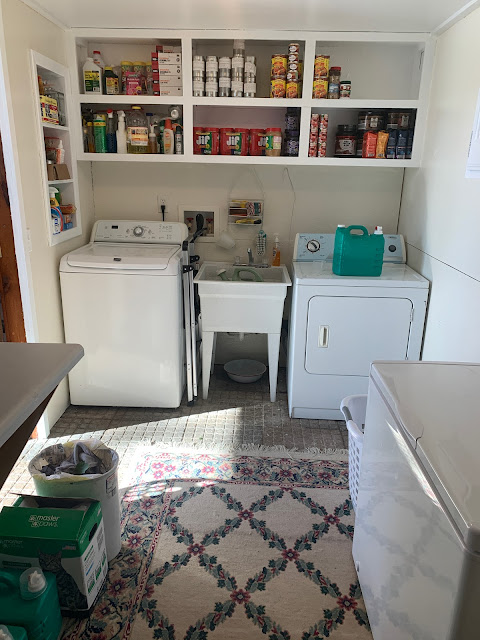
The first thing I did was "Marie Kondo" the room.  I took everything out, and donated a car load of stuff to the thrift store and threw out anything not worthy enough to even be donated.  I removed anything that wasn't a food item, garden item, or cleaning item to another closet.  This room was going to be used strictly for food & cleaning supplies, and also to hold a few garden items that can't freeze in the winter.  Then, I gave it a good cleaning and a fresh coat of paint.  This time I used semi-gloss on the walls so I could easily wipe them down, and high-gloss on the shelves.  I painted the shelves pure white, and for the walls I mixed three different shades of white together to create an off-white color.  I did this so I could use up paint I already had rather than buy more paint.  I spent $0.00 on this room.


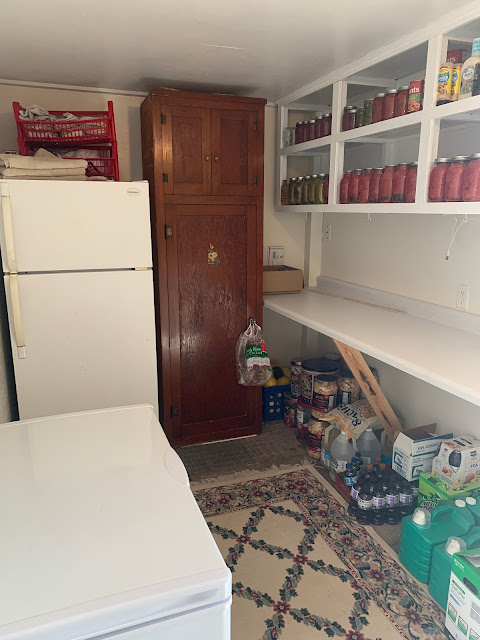
The room holds our washer and dryer, the wash basin, a refrigerator, a chest freezer, and a brown storage cupboard.  I live in a house in the country built in the late 1800's so I do have mice.  The food that is stored in the brown storage cupboard is stuff mice could get into.  The mice can't get inside the storage cupboard.  The food mice can't get into (like canned goods) is stored on the shelves. 

On top of the refrigerator I store old towels and rags for cleaning.


There is a long counter on one wall I keep empty so when I buy new groceries I can set them there while I unpack.  The counter is also used by my kids when they come to visit as they bring more groceries than can fit in my kitchen.  I keep a box at the end of the counter for my cat Jackson.  He likes to hide in this room and sleep in the box when the grandkids are over.  It's his secret hiding place, where he feels safe from toddlers. 😂

Underneath the counter I store my winter squash,  dried beans in metal containers, vinegars, drinks, bird food, and more cleaning products.  Mostly big, bulky stuff that doesn't fit on the shelves.


I completed the room by adding a floor rug I already owned but was not using.

I can't believe how much JOY this room brings me now.  Marie Kondo was right!  If it doesn't bring you JOY...get rid of it!  I use to hate even walking in this room, now when I step inside I smile because it's so clean and orderly.  Even the men in my family commented how much they appreciate that this room is clean and orderly now.  I think we were all getting frustrated with the "BEFORE" but no one wanted to take the time and energy to fix it because after all, "It's just a laundry room".

I thought of buying some of those cute signs that say "Laundry Room" or some cute baskets, but you know what,  "It's really not necessary."  I just cleaned it all up and donated so much, why spend more $$$$ to clutter it again?  I love it just the way it is.

Edited Post on 2/7/22 to add:

A reader commented that she had never seen a laundry room used as a pantry before, so I wanted to edit this post explaining how that came about.

My laundry room is located in the sunroom, which is on the lowest level of the house.  My kitchen is upstairs and quite small.  There is not enough room in the kitchen for a large refrigerator or to even to store all the food my family needs. In addition, our upstairs dining room only seats four, so anytime we have company we need to eat at the larger table in the sunroom which seats eight.  

So because of the small kitchen and the large dining area in the sunroom, we thought the laundry room would also be the perfect place to store a second refrigerator, a freezer, and extra canned and dry goods.  It actually works out really well for parties, because I can store a lot of the extra party food in the laundry room fridge and put food on the laundry room counter.  Sometimes, running downstairs to retrieve something when I'm cooking upstairs in the kitchen can be a pain.  But most of the food down in the laundry room is an "extra" and I already have it in the upstairs kitchen anyway.  


In the picture above and below the door on the left leads to the laundry room/pantry.  So the accessibility works quite well when hosting large dinner parties.  I even keep extra dishes in the hutch so I'm not running up and down the stairs for plates and cups.


So what about you?  Do you have a messy, cluttered room in your house that needs the Marie Kondo method?  I'd love to hear from you!

Have A Great Day!  Amy

Linking Up with these Fabulous Blogs HERE!
 

Sunday, October 3, 2021

Painting A Large Room From Tuscan Gold to Farmhouse White and My Master Bedroom Suite Update

Well, this post has been a long time coming.  Although I seriously doubt anyone has been waiting on pins and needles to see this post, I apologize for it's delay.  Every winter I like to do at least one interior  home remodeling project.  Last winter I only planned on doing one:  painting my large sunroom and craft room white.  I thought the project would take so long, that I wouldn't have time to do anything else.  But it only turned out to take me about three weeks (with my hubby's help on the high points) so then I decided I had time to repaint the upstairs bathroom.  Well, that project ended up being a bigger job than I thought (read all about it HERE), and it took the rest of the winter.  The next thing I knew it was time for our spring vacation, spring garden chores, summer gardening, fall harvest, fall vacation...well, you get the picture.  I got busy.  Today, I finally decided to take some time to write the long awaited post!  It rained last night, and I don't like to work in the garden when all the foliage is all wet, so I'm waiting till things dry out a bit before I go out there to do some chores.

Now, finally onto the re-decorating!  This is our large sunroom which my husband built himself about seventeen years ago.  During that time period, the tuscan look was all the rage, so the walls were stuccoed and distressed with gold paint and stains.  You can get a peek of the before look HERE, and  HERE .
I thought about removing the stucco, but I couldn't bear the monumental task and I decided to leave it.  I'm really glad I made that decision, because I love it painted it white and I really think the texture adds to the farmhouse look.


This room is used for large group entertaining.  Our family has grown so much that we no longer fit at our kitchen table upstairs, so when we eat together, we carry everything downstairs to eat at this table which seats eight.  Although, now that has been maxed out with the birth of Elisha so it won't be long before we have to bring out the card table!


The addition was just attached to the outside of our home, that is why there is exposed brick and field stone.  Our house is built on a hill with a walk out field stone basement.  The exterior of the house is brick.  The red doors lead out to a screened in porch.  The brick portion of the house is the first level of our home.  The field stone portion is the walk out basement.  The stairs lead to the balcony which holds our family room or "master bedroom suite" and also the older portion of the house.


The addition is heated with the wood stove.  It keeps it plenty warm!


The paint color is a pure white, no creamy undertones at all.


All around the room is a shelf where I placed farmhouse decor and hung farmhouse paintings.  I actually was able to keep a lot of my tuscan decor since roosters are part of both farmhouse and tuscan designs.


As always, I really loved how everything seemed to "pop" when I painted the walls right.  The whole room seemed brighter, the woodwork really shone, and I loved how all the color in all the art work appeared brighter.


My craft room is right under the balcony, on the left side of the sunroom.  I didn't make any changes in this room other than painting the walls white.  I wanted one cohesive look throughout the whole sunroom, and painting all the walls the same color was the solution.


The cabinets are a creamy off-white color so there was still a nice contrast between the cabinets and the walls.  


In this picture, I am standing in our entryway on the balcony.  Here you can see the sunroom below and the "master bedroom suite" above.


This is our family room or "Master Bedroom Suite".  If you want to hear the long story of how this room came to be you will have to read this post HERE.


This room was renovated in 2019.  We were going to put wall to wall carpeting over the tile because we were always worried about the grandkids wrestling and falling on the hard tile.  We were also going to get new couches, but when "C" hit, we decided not to make the investment, being uncertain of the future.  Now, two years later, we've just decided it's fine the way it is and we don't plan on making any more changes, as, the future still seems to be uncertain.


We use this room in many different ways.  Sometimes company sleeps in this room, but most of the time my hubby and I sleep down here.  In the summer it is much cooler than sleeping upstairs, as the room is air-conditioned (we don't have central air, just two window air conditioners), so we sleep in the room during the hot summer months.  We also sleep in this room when my daughter and her family come over, as they take over the entire upstairs.  

There are sliding glass doors which separate the room from the tv viewing area.  There is also a drape that can be pulled back for privacy.


I kept all the colors neutral to blend in with the family room/tv viewing area, but then I added touches of blue for contrast.


I picked up these gorgeous steel blue pillows from HomeGoods.  They have an amazing feather texture on them.


I wanted the bedspread to be extra long so it covered the bed frame.  I was able to find this one on Amazon.  I like the leaf embroidering.  At the foot of the bed, I placed a throw and a TV tray.


Above the head board, I added a blue metal leaf art piece I also found at HomeGoods.


My husband closed off the portion of the room to the balcony by adding a book shelf.  A blue slipcovered chair sits in the corner.  There is no over-head lighting in this room, nor room for end tables, so I added a floor lamp.


Other than the bed throw, pillows, and metal artwork, I didn't buy anything to decorate this room and I just used items I already had around the house.


Although we never bought new couches, we did buy a new tv stand, coffee table, and dresser.  They are all from the same collection:  Better Home & Garden Modern Farmhouse Collection.  I can not recommend this furniture enough!  It is so inexpensive, yet the quality is amazing.  You do have to put it together yourself though, which may be a challenge for some people.

I placed a simple floral arrangement on the dresser and I added a romantic painting that has similar colors in it above.  I already owned the painting, so it was another item I did not have to buy!  Reduce, Reuse!


Well I hope you enjoyed my re-decorating projects.  I'm sorry it took so long to show ya'll the finished results.  This winter, if there's no world-crisis, I plan on renovating our laundry room/pantry.  It is such a mess!  It needs to be cleaned up and re-organized so badly!  And hopefully I'll remember to take Before pictures and post the After pictures more promptly.

Have A Great Day!  Amy

Linking Up with these Fabulous Blogs HERE!