Showing posts with label handmade card for little girl. Show all posts

Tuesday, September 12, 2023

Handmade Birthday Cards for Little Girls and Boys

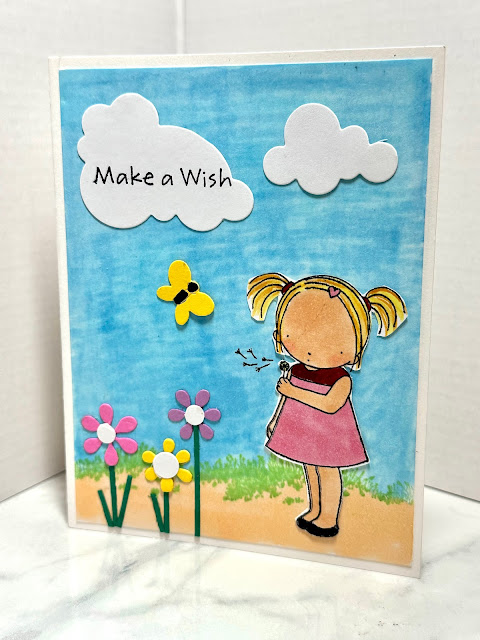
My daughter and her family came up to visit us for a week this summer.  We had so much fun, like we always do, and I promise someday soon I will blog about it.  I've been saying that a lot lately.  I don't know why it's been so hard for me this year to find the time to blog, but it has.  Anyway, while they were here we celebrated Atlethea's and Atticus' birthdays because they are both summer babies.  Here are the cards I made for them:


Atticus' card was made using the retired Stampin' Up! set "Ahoy, Matey".  I have always loved this set.  It is so cute!


To make this card, I created a little pirate scene.  I used a stencil and markers to create a sea and sky.  The clouds were cut using an MFT die.  Everything else was in the set.  I simply stamped the images, colored them in, and cut them out.  I popped the pirate on dimensionals but glued the chest and ship onto the card.  I stamped the sentiment onto the cloud.


For Alethea's card I used a Pure Innocence image from MFT.  I also created a background using markers.  The grass is a stamp.  The clouds are the same MFT die used in the pirate card above.  The butterfly and flowers are Cuttlebug dies.


For this card, I didn't use any dimensionals.  I just glued everything onto the card after coloring it in and cutting it out.  Once again I stamped the sentiment onto the cloud.


And here are the little rugrats proudly displaying their cards.  They are so CUTE!


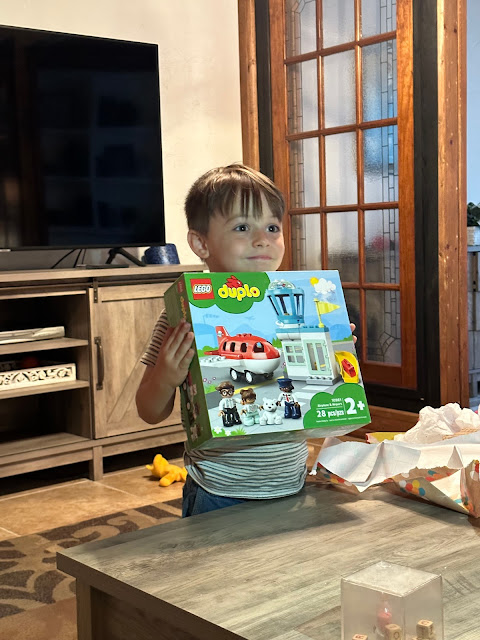
Here's some snapshots of the kids opening their presents.  They sure had fun!


Alethea has been really getting into painting her fingernails, so her mom bought her some pretty colors of nail polish.  


Atticus was super excited to get this "Action Bible"...perfect for little boys.  It is loaded with comic book style illustrations.  I would love to read this bible myself!


But perhaps Atticus' favorite gift of all was "The Armor of God".  He has been wanting this dress up set for so long!  He has the whole armor of God from Ephesians 6 completely memorized and he's only four years old.  Be sure to watch the second video below.  It's so adorable because he is so excited to put on this costume and he tells the significance of each piece.


And finally, here are some family videos.  Enjoy!


                                                            Alethea Opening Her Gifts:


Atticus Putting On the Armor of God


Singing Happy Birthday to the Grandkids


I hope you liked the cards and enjoyed this brief snapshot into my family.

Have A Great Day!  Amy

Linking Up with these Fabulous Blogs HERE!

Tuesday, August 16, 2022

A Handmade Card for a Little Ballerina

Hello!  If you missed me last week, we took a short little trip to see our granddaughter perform in her very first ballet!  To honor the occasion, I made her a "Ballerina Star" card using images from an old "Crafty Secrets" stamp set.


To make the card, I stamped the image on a piece of card stock, colored it in with Copic Markers, then cut it out with a oval Nestability Die.  I adhered that to a scalloped oval cut with another Nestability die.  To make the tutu, I stamped that separately and fussy cut it out.  Then I colored it in, sprinkled it with pink glitter, and use dimensionals to adhere it to the ballerina in order to give it some "pop"!


For the inside of the card, I used a "Congratulations" sentiment stamp along with a pair of ballet shoes stamp also from that same stamp kit.  I then hand wrote the rest of the sentiment.


Little girls love glitter and the color pink, so I adhered the main image panel to two sheets of pink card stock:  one sheet was a pink glitter sheet and the other was just plain pink.  I first wrapped some pink tulle around the pink card stock and tied in a bow with two different type of pink ribbon.  The sentiment tag was also cut with a Spellbinder Nestability and tied to the ribbon.

The sentiment reads "Ballerina Star".  Both the sentiment and the stars came in the same stamp set from Crafty Secrets.  This stamp set is no longer sold as it is retired, but you might still be able to find it on Etsy , Ebay, or Amazon.  Or if you're really desperate, shoot me an email and I will stamp off some images and pop it in the mail for you...United States only.


We weren't able to take any pictures or recordings of the performance, but I have a couple snapshots to share.  The first one is of Alethea with her "Dance Partner" or "Teacher".  She is not the teacher of Alethea's school, but she performed with Alethea, and I'm sure helped instruct her.  Each of the younger children got to perform a solo all by themselves with another older ballerina.  The older ballerinas were there for moral support and also for the younger students to follow as they are so young it's hard for them to remember all the choreography on their own.  I thought it was a great idea!


And here is the proud Grandma with her little ballerina.  I bought her a bouquet of flowers for the occasion and she was SO excited to get them.


Have A Great Day!  Amy

Linking Up with these Fabulous Blogs HERE!


Tuesday, March 16, 2021

Easter Cards For Boys & Girls

I am so excited for Easter this year as I will get to see my sweet little grand babies once again!  I put together some Easter Baskets for them and I made these cute little cards using all old supplies I already had in my stash.  Both cards use the same supplies and layout, but I changed the colors:  pink for my granddaughter and blue for my grandson.


The bunnies are those cute inexpensive adhesive felt  pieces you can find in the seasonal aisle of any craft store.   I used my Spellbinder's Nestabilities to create the oval shapes behind the bunnies.  I chose an oval shape to represent an egg.


The little eggs on the cards are just dimensional stickers I had in my stash already.

For each card, I just changed the color of the designer paper in the background.

I stamped the sentiment directly onto the oval panel and tied a coordinating ribbon around the card.


And for the inside of the card, I stamped this cute little chick and colored him in with pencils.


Have A Great Day!  Amy

Linking Up with these Fabulous Blogs HERE!


Tuesday, February 11, 2020

A Handmade Disney Valentine and A Galentine Card

With Valentine's Day this Friday I have two more Valentine Cards to show you.  If you missed my other Valentine cards I made this year, check them out HERE and HERE.

My darling granddaughter has officially entered the Disney Princess stage of life, and I'm sure it's all my fault.  I introduced her to Snow White when I was taking care of her last summer while mommy was in the hospital with baby Atticus.  To help occupy her during long car rides I would play Disney music videos on my phone.  Her parents don't have data with their phones, so she thought I had some type of magic phone that it could play cartoons.  Of all the videos I showed her, she loved the Snow White ones the most.  My husband thinks it's because I sound like Snow White when I talk (I really do!  I've always been embarrassed about my "funny" voice).  I say it's probably because her mother looks just like Snow White, with her dark hair and porcelain skin.  Or, maybe it's both.  Who knows? Wouldn't it be great if we could read the mind of a two year old?  Whatever the reason Alethea loved Snow White, it brought her comfort when she was apart from her parents for the very first time, and that's the most important thing.


To make my card, I actually had a Snow White stamp.  You can find Disney stamps on the Internet or in craft stores.  Mine is from Inkadinkado, but it's pretty old so I'm not sure if it's still available.  I'm sure you could also print an image off your computer and cut it out (just don't sell it and you probably won't be breaking any copy right laws) or cut images out of Disney coloring books.


I stamped my Snow White image on a separate piece of card stock, colored it in with Copic markers, and fussy cut it out.  I googled images of Snow White so I knew what colors to use.  I popped her up on dimensionals on the main image panel.

The two oval panels were cut with Spellbinder's Nestabilities.  I stamped a sentiment directly onto the main image panel.  I also stamped some flowers on to the main image panel and colored them to match Snow White's dress.  I also stamped two flowers on to separate card stock, colored them in, cut them out, and glued them on the main image panel.

I ran a yellow piece of card stock through my Cuttlebug to emboss hearts on it.  A yellow Prima flower and red ribbon finished the card.


Once the ribbon was wrapped around the yellow card base, I adhered the whole thing to a white card base.


My next card is a "Galentine Card" I made for one of my very best friends who is going through a difficult time.  I hope it encourages her.


This card is made with a die.  All the little hearts are partially cut by the die.  I bent a few hearts out, colored the hearts with pink and red makers, and then put some Stickles on them too.


Because when you bend the hearts out you can see what's behind them, I added a red card stock base behind the white base.


I stamped a sentiment beneath the heart and added a few more stamped hearts around the sentiment.
The entire card was then glued to a white card base.


And finally, I wanted to show you a couple of pictures of Alethea receiving her Valentine box from me.  I had to send it a bit early based on my schedule,  otherwise it would have been a day late.  Her mother said she was "Overjoyed" by the treats I sent her and that she loved the Snow White card and started singing the "Hi Ho" song.


You can see how happy she is in these photos by these little, simple gifts.  It gives me so much joy to see her so happy.  


Have A Great Day and a Great Valentine's Day too!  Take some time this weekend to show the loved ones in your life how much you care.

Linking Up with these Fabulous Blogs HERE!

Tuesday, July 23, 2019

Alethea Turns Two! A Toddler Girl's Handmade Birthday Card

My precious granddaughter Alethea turned two last month.  I wasn't able to make it to her big family and friends birthday party as it was too close to Atticus' due date and I couldn't make the trip twice.  But we did have a smaller, more intimate nuclear family party for her later when I arrived.  So this lucky little girl got two birthday parties and two cakes!


As always, I made her a handmade birthday card.  I used the same Crafty Secrets set "Birthday Kids" that I used last year (you can see last years card in THIS POST).  I think I will use this same set for all my grand children's birthdays.  It's just so cute! I love the vintage images and the numbers.

To create my card I first stamped the background with the background image stamp in the set in a light pink.  I then put dots of clear Stickles randomly in the background.


The sentiments were stamped directly onto the main image panel in different colors of ink.  The little girl was stamped on a separate sheet of card stock and then cut out and framed using Spellbinder's Nestabilities.  The cake was also stamped on a separate sheet of card stock, fussy cut, then glued outside the frame.


When the card was complete,  I adhered the entire front to a pink card stock base.


And here are some pictures of Alethea's little birthday party with us and a few of her larger party.


Alethea's mom said Alethea was so excited for her big birthday party.  She loved helping mom in the kitchen making the cupcakes.  She was tickled pink that the party was just for her.  She is use to going to birthday parties for other people, but this was the first year she fully understood the party was for her.


She was so excited to open our gift from her:  a Melissa & Doug Fold and Go Miniature Dollhouse.  Her mom said every time she went to her cousin's house she would fight with her cousin over this dollhouse, so we thought it was about time she got her very own!  And she was excited to get it!


Her mom kept Alethea's party much more simple and low key this year (in comparison to last years😊!) because she was 9 months pregnant at the time.  They had the party in a local park and this was the table Ashley set up for her.


Alethea's mom and snuck out prior to our little nuclear family party to pick up a small cake and a balloon.  When we opened the door to the apartment we sung "Happy Birthday" and showed her the cake and the balloon.  Alethea had no interest in the cake at first, but went ga-ga over the balloon!


These are the home made cupcakes mom made for Alethea's first party.  Notice her 9 month pregnant belly sticking out on top of the picture?  ha ha!


While cleaning out some cupboards I found this cute little sun hat and I had no idea where it came from.  I'm thinking it was probably an adults garden hat that shrunk in the wash.  Good thing I kept it because it's the perfect fit for Alethea! She wore it quite often the few days we were with her.


Here Alethea is examining my homemade card.  Dad made sure Alethea took time to open and look at the card before opening the gift.  He knows how hard I work on those cards!


And finally a picture of Grandpa Todd showing Alethea where to put the furniture in the dollhouse.  Hopefully she will have years of fun playing with this dollhouse.


Have A Great Day!  Amy

Linking Up with these Fabulous Blogs HERE!