Showing posts with label handmade cards. Show all posts

Tuesday, November 11, 2025

Handmade Fall Cards for Small Children

Halloween has passed, Thanksgiving is just around the corner, and then it'll be Christmas Time!  This past weekend, my husband and I went to our grandchildren's home to celebrate "Grandparents Day" at their school.  I brought them some handmade fall cards and a fall gift bag.  These are the cards I made for each grandchild.


For my two older grandsons I made them each a fox card.  I bought this "Finley the Fox" die from Spellbinders.  I thought it was so cute, and I love foxes!  I've had the pleasure of seeing one running through my yard a few times and that always gets me excited.  Of course, I don't own any chickens that I need to worry about 😀


I got the idea for this card from the Spellbinder's website.  They always have so many great examples of how to use their products. 

To make my card, I found some dark fall paper to use as a background and then I created a frame by using an arched die.  I embossed chocolate brown paper with a tree limb embossing folder first, then I cut out the frame and popped it all up on dimensionals.  The flowers and butterfly were included with the fox.  I just cut all the pieces from the Finley the Fox set out of different shades of card stock, ink blended them, then adhered them to the card. The fox is also popped up on dimensionals.  I stamped the sentiment onto a separate piece of card stock because the background paper was too dark to make it pop.


For my Second "Finley the Fox" card I used a similar idea but this time used different papers/colors, and I added leaves instead of using the flower stems from the set.


To make my card, I picked a fall background for the opening and a die to make a rectangular frame.  After I cut my frame, I popped it up on dimensionals to create some depth.  This time my background was lighter, so I could stamp my sentiment right on the card.  I cut some fall leaves using old Cuttlebug dies and adhered them around the frame.  This time, I cut my butterfly and fox in different colors, assembled them, and adhered them to the card.  I finished the card by embellishing with gem stones in fall colors. 


My next card is for my youngest grandson who is about 18 months old.  Because he is still a baby, I wanted his card to have some texture so I made his with felt pumpkins and metal leaves.


To make this card, I used a simple layout with polka dot designer paper on the base of the card and then a solid purple strip where I could put my pumpkins and leaves.  The pumpkins are felt stickers from Martha Stewart.  I added metal leaf brads in-between the pumpkins.  The sentiment was stamped separately onto white card stock and bordered with black card stock.


My final card was for my granddaughter and was the most complicated to make.  All the detail that went into making this card is ridiculous.  I think it took me all afternoon to make.  I cased the sketch of this card from Pinterest, but I changed all the paper and stamps.


To make this card I used images from several different sets.  The scarecrow is the vintage scarecrow image from the Wizard of Oz from Crafty Secrets.  The pumpkin and sentiment are from Hero Arts, and the fence is from Martha Stewart. I stamped, colored, and fussy cut everything out.  I picked a fall designer paper for the leafy background.  I used a sewing machine to stitch around the card, the circle, and the zig-zag in the designer paper.  The sunflower was cut with an MFT die, then ink blended and adhered to the card.  The plain off white background was dry embossed using a Cuttlebug tree limb embossing folder.  The scarecrow is popped up on dimenionals along with the fence.


The Grandchildren were so excited to get their fall gift  bags.  They've come to expect presents from Grandma every time she arrives.  Little Elisha was asking me when he could open his present for a day and a half before we actually had the time to do so.  


Here they are posing with their newly opened cards.  Everyone seems super excited except Baby Lazarus.  😀. I think all the attention and excitement was getting to him.


The whole point of our visit was Grandparents Day.  Every year their school has the grandparents come to visit to see what they are learning and doing in school. They have a special program involving the whole school, and then we break up and go and visit each of our grandchild's classrooms and meet their teachers.


Alethea was proud to show us her weaving and trojan horse she made.  She completed her weaving, but was still working on her horse.


Atticus was thrilled to show us his desk and opened up his binder to show us everything he has done since the beginning of the new year.


I got such a kick out of what he wrote as one of his favorite things to do with his grandparents.  It couldn't have made me more proud. 😁


Have A Great Day!  Amy

Linking Up with these Fabulous Blogs HERE!

For more ideas on Fall Cards check out these posts:


Tuesday, June 24, 2025

"Deja Hue" Dirty Dozen Design Team Challenge


Over a year ago I wrote in THIS POST that I was given the great honor in the paper-crafting world to join the "Dirty Dozen" on Splitcoaststampers.   Splitcoaststampers is an on-line paper crafting community where crafters can learn new techniques, chit chat with each other, share their art work, and so much more.  One part of this community is "The Dirty Dozen".  This is an invitation only group of crafters whose work is seen as exemplary so they are asked to be part of the Dirty Dozen.  The requirements of the Dirty Dozen is to create six cards for six months centered around a different theme each month.  The cards then are uploaded into the "Dirty Dozen Gallery" and only fan club members are allowed to see them.  After six months, Dirty Dozen members are allowed to post them elsewhere on social media or their blogs.  I've been showing  five different sets of cards each month, and today I am finally going to show you my very last set of cards.

The theme for my last Dirty Dozen Challenge was "Deja Hue".  It was a "Play on Words" challenge.  Deja Vu is the illusion of remembering scenes and events when experienced for the first time.  For this challenge, participants were told that instead of scenes and events, to remember colors (hues).  Some ideas for inspiration were:

  • Be inspired by color combinations
  • Make a new card inspired by the colors of an older card of yours
  • Make a project using a color combination that has had meaning in your life
  • Try any coloring tutorial
There are no hard rules in the Dirty Dozen Challenge so I just focused some of my six cards around color itself.

Stitched Paint Palette


For my first card, I used one of Spellbinder's stitching dies called "Stitched Paint Palette".  I love the sentiment from MFT.  I always feel we should be ourselves in life and not to pretend to be someone we're not. 

To make this card, I cut out all the pieces in the die set and stitched them up.  The color pieces and solid white panel behind the brush were popped up on dimensionals.  I stamped the sentiment in white craft ink and used white embossing powder to really make it pop.


Smooshed Ink


For my next card, I actually did try a coloring technique I found on Pinterest called "Smooshed Ink".  It's the easiest technique in the world; anyone can do it.  Simply take a clear acrylic stamping block, apply several different shades of ink to it, and smoosh it onto your paper.

To make my card, after I did the "Smooshed Ink" technique I stamped some funky flowers in black ink and then embossed them a sparkly black embossing powder.  The sentiment is a die cut.  I added crystals for embellishment.  It is a very simple but interesting card.


Wedding Colors 


Anyone who got married in the 80's probably had peach as their wedding color.  I had peach as my main color with teal as my accent.

To make this card I used the stamp set "Spring Time Wishes" from MFT.  I stamped the girl out twice, once on the main panel and another time on a piece of scrap paper so I could pop her skirt, flowers and hair bow up on dimensionals.  I embossed the background with a Cuttlebug embossing folder and then swiped a white ink over the raised portions to pop them out more.  


Paint Palette


This was another easy card to make.  I did the background by just swiping water colors in streaks onto watercolor paper.  Then I cut a paint palette using a die from MFT and adhered all the pieces together.  The background on the paint palette was done with markers.  The sentiment was created with white ink and white embossing powder.


French Painter


For this card I used a new-to-me product called "Lunar Paste" and a stencil.  I put the shiny, textured  inside the stencil holes which created this fun paint splatter background.  The little girl is a stamp from MFT.  I stamped her separately, fussy-cut her out, then popped her up on dimensionals.  The sentiment was adhered with two purple brads. 


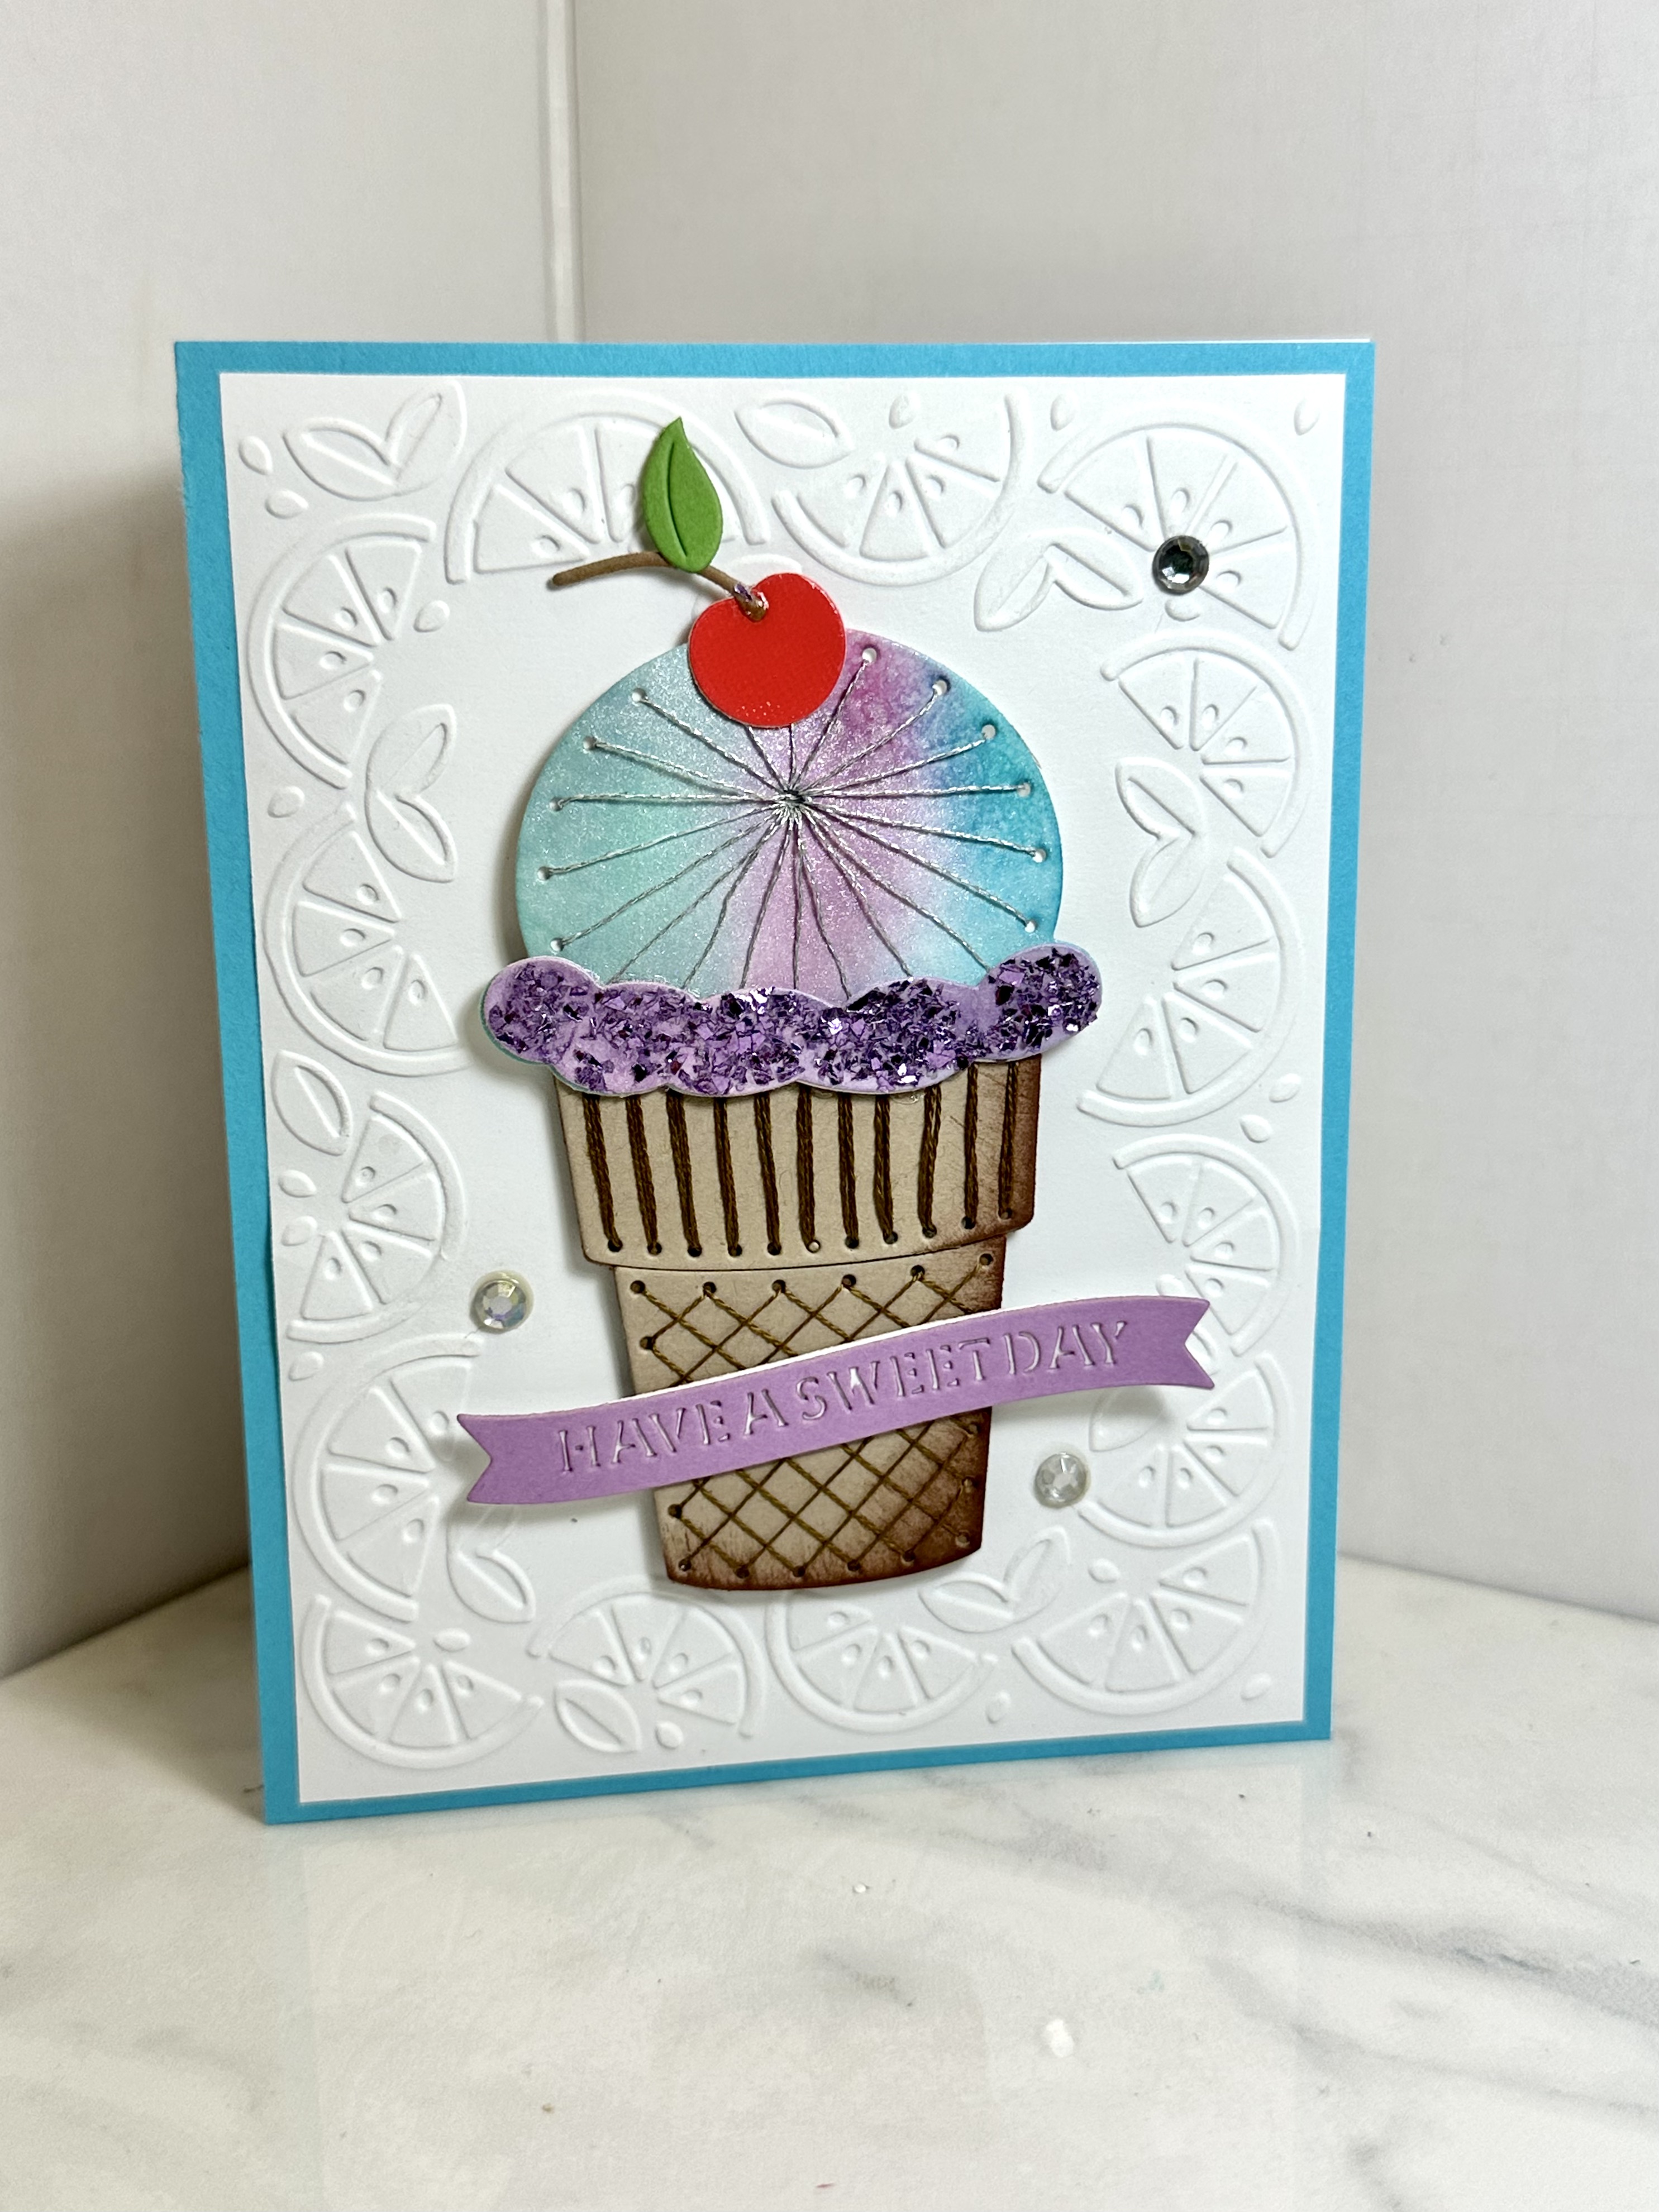
Have A Sweet Day


For my last card I chose colors from a Splitcoaststampers color challenge.  

To make this card, I used a Spellbinder's stitching die called "Stitched Ice Cream".  I cut all my pieces out, did some ink blending, and then stitched and assembled.  I sprayed sheer shimmer over the ice cream and added some glitter too.  The cherry has glossy accents on it.  The background was done with a Cuttlebug embossing folder.


I hope you enjoyed my last set of Dirty Dozen cards.  Now I have so many cards, I have no need to make new ones for a long, long time. 

Have A Great Day!  Amy

Linking Up with these Fabulous Blogs HERE!
 

Tuesday, February 18, 2025

"Summer Jobs" Dirty Dozen Card-Making Challenge

Nine months ago I wrote in THIS POST that I was given the great honor in the paper-crafting world to join the "Dirty Dozen" on Splitcoaststampers.   Splitcoaststampers is an on-line paper crafting community where crafters can learn new techniques, chit chat with each other, share their art work, and so much more.  One part of this community is "The Dirty Dozen".  This is an invitation only group of crafters whose work is seen as exemplary so they are asked to be part of the Dirty Dozen.  The requirements of the Dirty Dozen is to create six cards for six months centered around a different theme each month.  The cards then are uploaded into the "Dirty Dozen Gallery" and only fan club members are allowed to see them.  After six months, Dirty Dozen members are allowed to post them elsewhere on social media or their blogs.  Well, it has been six months since I completed my first challenge, so I can finally show me my first set of cards!

The third Dirty Dozen theme was "Summer Jobs" and these are my submissions:

Farm Card

The first photo shows the outside of the farm card.  Once opened (the second photo) is another farm scene.


I live in a rural area and summer time provides a lot of summer jobs on farms.  

I created a Gatefold design card following a tutorial on Splitcoaststampers .  I used a combination of stamps and my Cricket machine to make all the farm images.  The barn, Sio, fence, tractor, and tree were all made with the "Country Life" Cricut cartridge.  The pig, farmer, horse, and chickens are from MFT "Punny Farm".  The sentiment is from Crafty Secrets "Down on the Farm".  I used stencils from Taylor Expressions to create the clouds and the grass.


Canning Card

My next card shows my summer job:  canning. I spend a good part of my summer canning vegetables from my garden.


To make this card I used a free canning jar image off the internet and printed it out in two different sizes.  The strawberries are stamps.  I put Glossy accents on the large strawberry and the strawberry tag.  I cut some red gingham designer paper by hand and glued it to the top of the larger jar, adding a twine bow and a tag.  The sentiment is from a stamp in my stash, and is cut with an MFT banner die.  I created the jam in the smaller jar just by coloring it in with a Copic marker.  The strawberry designer paper is from Jellibean Soup "Coconut Lime Soup".


Beach Scene Card

Lots of people work as lifeguards in the summer, so I created a beach scene card.


To make this card I used retired Stampin' Up! "Sparkling Summer".  The sentiment is from Flourishes "Kid's Play".  I used Taylored Expressions cloud stencil for the background and then colored my own sea and sand with Copic Markers.  I added some Dew Drops to the sand to make it more sparkly.  The beach images were all stamped on to separate card stock and cut out by hand.  The sentiment is from Flourish's "Kids at Play" and cut with a MFT banner die.  I added a ribbon and a sea shell stick pin for embellishment.


Ice Cream Cone Card

Another summer job is an ice cream worker.  We have neighborhood ice cream trucks in the summer plus all our ice cream shops usualy re-open for the summer.  In Wisconsin, many ice cream stores are only open in the summer months.


To make this card I used my Circuit machine once again and cut out a large cupcake using the cartridge "Sweet Treats".  I dry embossed the cone and the background paper using Cuttlebug embossing Folders.  I colored the sprinkles various pastel colors and then put glitter glue on them.  The sentiment is from Hero Arts "Cupcakes".  I cut the tag and the white scalloped background with Spellbinder's Nestabilies.  Ribbon, twin, and a button are the embellishments.  The ice cream cone is popped up on dimensionals


Camping Card

In the summer, camps open up again and many people are hired to work as camp counselors, camp employees, etc. 


To make this card, I followed a Diorama Tutorial on Splitcoaststampers.  I used images from retired Stampin' Up! sets "Happy Camper" and "Travel Time".  I stamped all the images onto separate card stock, colored them in, and fussy cut them out then glued them to my diorama.  The starry background is designer paper.  


Gardening Card

Another one of my summer jobs is gardening so I created a gardening card.


To make this card, I used the MFT stamp set "Can Ya Dig It?"  I stamped all the images separately, cut them out, and glued them onto the card or used dimensionals.  The sentiment and seedling were stamped directly onto the card stock.  I created a trellis background using a die.  The clouds and sun were also cut from dies.  The flower background is designer paper. 


I hope you enjoyed looking at my Dirty Dozen Design Team cards.  I have shown you about half of them now.  There is more to come next month!

Have A Great Day!  Amy

Linking Up with these Fabulous Blogs HERE!

See More Dirty Dozen Cards in These Posts:


Tuesday, February 4, 2025

Under the Sea Handmade Cards

Spellbinders came out with these really cool tunnel dies last year, that I thought were pretty unique, so I ordered a couple of them.  One is for underwater scenes and the other one I purchased was for sky scenes.  This week, I will share my Under-the-Sea cards I made with these new dies.


The main cutting die set is on the right and is called "Underwater Tunnel".  The die helps you create a 3D underwater scene.  It comes with an anchor die and some plant life, but I also purchased some coordinating die sets to go with it "Underwater Marine Life" and "Luna the Seahorse".


The tunnel dies are so versatile!  You can use just one or two of the dies to keep the card more slim, or all three.  The card below using only one die cut layer, which makes for a slimmer card and therefore easier to mail.  I stamped a water background in versamark, embossed it with clear embossing power, heat set, then ink blended over it.  The water bubble stamps and ink blending make a more realistic water look.  The top layer is popped up on dimensionals, then I just glued all my little pieces on.  

There is a sentiment stamp set that coordinates with this set, but I didn't buy it.  I tell you, you can go broke just buying all the "add ons" that come with one new die set.  So, I cheated, and just typed all the sentiments from the set onto my computer and printed them out. Ha!


My next card shows how I used the die set to make a shaker card!  Once again, I only used one layer mounted up on dimensionals with a piece of acetate in-between.  I did the same ink blending technique to create the bubbles.  I put sequins inside my shaker card.


And here is a card using all three die cuts.  Each layer is popped up on dimensionals so it ends up being a pretty thick diorama card.  I dry embossed waves on the white card stock and added bubble embellishments.


Now, when you cut that many holes in your card stock you end up with a lot of scraps, so the next few cards I will do the reverse to use up those scraps!

Here I just took the punched out pieces and glued them flat to the card.


For this card, I dry embossed all the scraps,


I had some old Cuttlebug sea die scraps too (the whale, crab, star fish, and little fish) so I decided to use them up too.


 These were such fun cards to make!  I really enjoyed working with these new tunnel dies!

Have A Great Day!  Amy

Linking Up with these Fabulous Blogs HERE!