Over a year ago I wrote in THIS POST that I was given the great honor in the paper-crafting world to join the "Dirty Dozen" on Splitcoaststampers. Splitcoaststampers is an on-line paper crafting community where crafters can learn new techniques, chit chat with each other, share their art work, and so much more. One part of this community is "The Dirty Dozen". This is an invitation only group of crafters whose work is seen as exemplary so they are asked to be part of the Dirty Dozen. The requirements of the Dirty Dozen is to create six cards for six months centered around a different theme each month. The cards then are uploaded into the "Dirty Dozen Gallery" and only fan club members are allowed to see them. After six months, Dirty Dozen members are allowed to post them elsewhere on social media or their blogs. I've been showing five different sets of cards each month, and today I am finally going to show you my very last set of cards.
The theme for my last Dirty Dozen Challenge was "Deja Hue". It was a "Play on Words" challenge. Deja Vu is the illusion of remembering scenes and events when experienced for the first time. For this challenge, participants were told that instead of scenes and events, to remember colors (hues). Some ideas for inspiration were:
- Be inspired by color combinations
- Make a new card inspired by the colors of an older card of yours
- Make a project using a color combination that has had meaning in your life
- Try any coloring tutorial
There are no hard rules in the Dirty Dozen Challenge so I just focused some of my six cards around color itself.
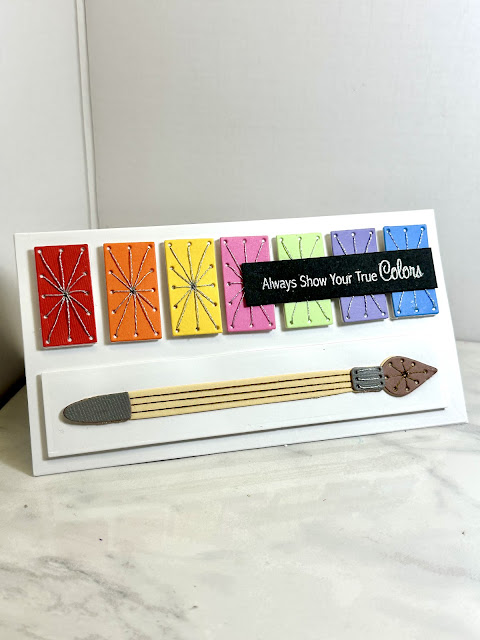
Stitched Paint Palette
For my first card, I used one of Spellbinder's stitching dies called "Stitched Paint Palette". I love the sentiment from MFT. I always feel we should be ourselves in life and not to pretend to be someone we're not.
To make this card, I cut out all the pieces in the die set and stitched them up. The color pieces and solid white panel behind the brush were popped up on dimensionals. I stamped the sentiment in white craft ink and used white embossing powder to really make it pop.
Smooshed Ink
For my next card, I actually did try a coloring technique I found on Pinterest called "Smooshed Ink". It's the easiest technique in the world; anyone can do it. Simply take a clear acrylic stamping block, apply several different shades of ink to it, and smoosh it onto your paper.
To make my card, after I did the "Smooshed Ink" technique I stamped some funky flowers in black ink and then embossed them a sparkly black embossing powder. The sentiment is a die cut. I added crystals for embellishment. It is a very simple but interesting card.
Wedding Colors
Anyone who got married in the 80's probably had peach as their wedding color. I had peach as my main color with teal as my accent.
To make this card I used the stamp set "Spring Time Wishes" from MFT. I stamped the girl out twice, once on the main panel and another time on a piece of scrap paper so I could pop her skirt, flowers and hair bow up on dimensionals. I embossed the background with a Cuttlebug embossing folder and then swiped a white ink over the raised portions to pop them out more.
Paint Palette
This was another easy card to make. I did the background by just swiping water colors in streaks onto watercolor paper. Then I cut a paint palette using a die from MFT and adhered all the pieces together. The background on the paint palette was done with markers. The sentiment was created with white ink and white embossing powder.
French Painter
For this card I used a new-to-me product called "Lunar Paste" and a stencil. I put the shiny, textured inside the stencil holes which created this fun paint splatter background. The little girl is a stamp from MFT. I stamped her separately, fussy-cut her out, then popped her up on dimensionals. The sentiment was adhered with two purple brads.
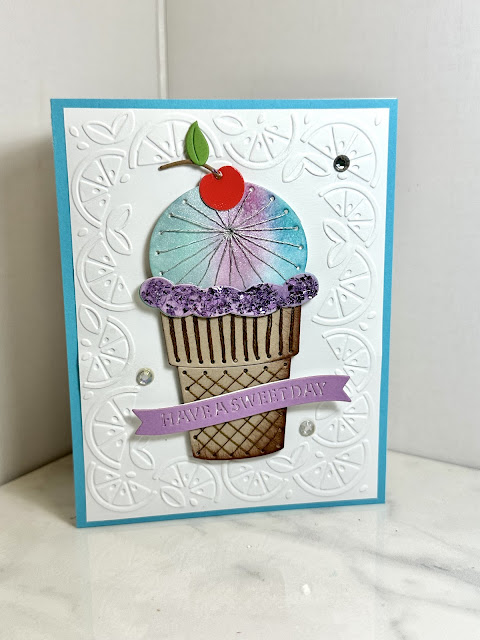
Have A Sweet Day
For my last card I chose colors from a Splitcoaststampers color challenge.
To make this card, I used a Spellbinder's stitching die called "Stitched Ice Cream". I cut all my pieces out, did some ink blending, and then stitched and assembled. I sprayed sheer shimmer over the ice cream and added some glitter too. The cherry has glossy accents on it. The background was done with a Cuttlebug embossing folder.
Have A Great Day! Amy
Linking Up with these Fabulous Blogs HERE!


I am always in awe of those who have artistic creative talents ! Thanks for sharing- so lovely.
ReplyDeleteThank you so much. You are so kind.
DeleteOh my goodness, Amy! You blend so many cool techniques with your artistic talents and skill. I wish I had the creativity to experiment and the eye to put materials and colors together! It's a gift and you have it!
ReplyDeleteAww, thanks! You are so sweet.
DeleteThese are all so beautiful! I LOVE the colors.
ReplyDeleteThanks Joanne!
DeleteOh, my gosh. I love the stitched cards so much. What a special touch the stitching adds. That first card might be my favorite. Love the bright colors, the paintbrush. But scrolling back through the cards again, I also love the little artist with her beret and paint dipped paintbrush. I had a peach/teal wedding in the early '90s!! Loved my dress, the invitations, the colors we used and thought I had found my happily ever after. But it was not meant to be.
ReplyDeleteYour artistry is an inspiration.
Thanks Leslie. I love the stitched cards the most too. Isn't it funny how everyone follows the same trends for weddings, even down to the colors. Why do we that? I haven't been to a single wedding in the past decade that wasn't exactly the same as all the other weddings I've been to.
DeleteThese are all so fun and colorful! Beautifully designed!
ReplyDeleteThank you!
Delete